>
I’ve posted recipes for this bread–or variations of it–in the past on numerous occasions, but the two most popular are here and here. Those two posts, in fact, draw the largest amount of visitors to this blog everyday (through search engines, I imagine). Yup, I can carry things on my bike until I’m blue in the face, and talk about quotes and all things spiritual…but the topic that gets the most hits are my recipes for Ezekiel Bread.
This post is a little different in that I made the bread at home (opposed to at work in a commercial kitchen), and I did not use any refined (white) flour; just whole wheat. And for that reason the recipe is slightly different than the others (a printable recipe follows the pictures). This one, I believe, is more true…refined flour was unknown in biblical times. But I’m getting ahead of myself. In this post I also wanted to offer some of my personal views on Ezekiel bread and its recipes in general (I know what you’re thinking…here he goes again, up on his little soapbox…but hey, isn’t that why people write blogs in the first place).
Many people know–but some may do not–that the original recipe, vague as it is, comes directly from the Bible, in the Book of Ezekiel.
“Take wheat and barley, beans and lentils, millet and spelt; put them in a storage jar and use them to make bread for yourself.” Ezekiel 4:9 (NIV)
That’s it; that’s all it says. But I’m getting ahead again.
A couple years ago I dropped off a loaf of this bread–still warm–to a store that bakes their own bread (a few friends work there). After I left I had heard how a couple of them said that while the bread was delicious it was not really Ezekiel bread because real Ezekiel bread is made from sprouted grains and contains no flour. This did not surprise me because I had heard comments like this before (read them, mostly, on the Internet). I have to wonder how someone would have such a definitive opinion on this recipe from just one sentence. Here it is again:
“Take wheat and barley, beans and lentils, millet and spelt; put them in a storage jar and use them to make bread for yourself.” Ezekiel 4:9 (NIV)
Before I offer further views I first have to say that I read this recipe the same way I read the Bible; I read the Bible with a metaphysical view and am intrigued by it’s mystery (and even sometimes overwhelmed), but view it mostly as metaphor. In short, I am not a literalist and truly believe that most if not all of the Bible is open to interpretation (and yes, I realize that some may say that I’m going to hell for this proclamation, so here’s another one…I don’t believe that hell exists). Now I’m really getting off point.
This said, I can see how someone could interpret the above sentence to say to sprout the grains before making bread with them…but then again, it doesn’t actually say that. There is no mention of adding water to the jar to sprout the grains or even how to make a sort of dough…but just to use them to make bread for yourself (and I have neither the time nor desire to expound on all the metaphors of bread in the Bible). But if a person were to add water the grain would eventually begin to ferment (and leaven) given the amount of time Ezekiel is told to lie on his side in the desert. And as far as using flour in this recipe…umm, I may be wrong but I’m pretty sure that flour is made from wheat, spelt, and barley; three of the main ingredients.
Nobody that I know of would want to take this recipe to the literal extent. After giving Ezekiel the recipe, instructing how much of it he should eat each day, and how long he is to lie on each side in the desert, God tells Ezekiel to cook the bread over human excrement, to which Ezekiel pleads that he be allowed to use animal dung instead of human waste. Thankfully God agrees. I’m still trying to figure out the metaphorical or mystical reason behind this; surely it is not literal. The Book of Ezekiel is, of course, a record of a series of visions recorded by the Prophet Ezekiel. Thus in my view there is no way to tell what the actual recipe was or is.
As aforementioned, like most (or all) of the Bible, I believe that this recipe (sentence) is open to interpretation. The recipe that follows is my personal interpretation.
What’s slightly different in this recipe (opposed to previous versions where I used some white flour) is that rather than using a loose pre-ferment (French poolish), I used a firmer one, more like an Italian biga. And I also incorporated the autolyse method with the remaining flour (meaning I soaked the whole wheat flour to soften it). Anyhow, here it is in words and pictures; a printable recipe follows. It’s a simple recipe…basically, put some beans and grains in a pot and make bread for yourself.
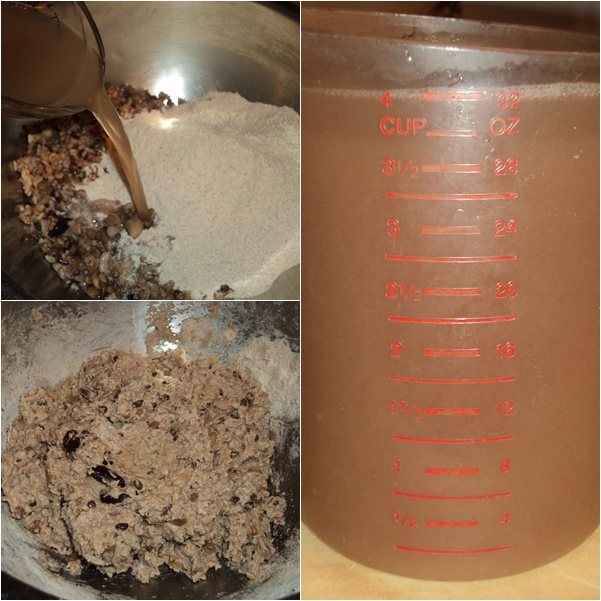
Start by boiling the grains in logical succession to insure that they are thoroughly cooked without completely dissolving. If too much water evaporates add more to the pot (you’ll need some of the cooking liquid for the bread recipe. by using the cooking liquid you are utilizing nutrients that may have been leached out of the grains during their cooking).

After all of the grains are soft, strain them–reserving the liquid–and allow them to cool off (refrigerate them if necessary). Beautiful, aren’t they?

Make the pre-ferment with the cooked grains, whole wheat flour, and a portion of the cooking liquid.
Allow the pre-ferment to rest for at least an hour or two ( I let it ferment overnight). Then, in a second bowl, combine the whole wheat flour with some of the remaining cooking liquid (do not add yeast or anything else to this at this point…this is the autolyse method I referred to earlier). The flour-liquid mixture only needs to rest for an hour or so.
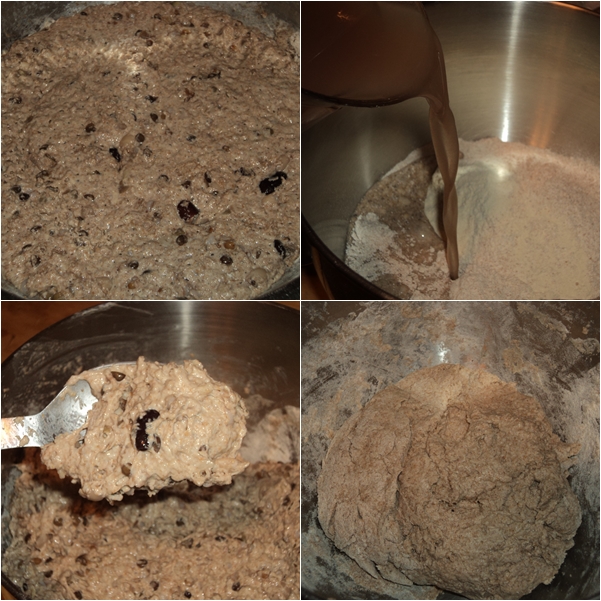
Next, combine the pre-ferment with the flour-liquid mixture, along with a bit of honey, olive oil, salt, and an additional pinch of yeast. Knead the dough until it passes the windowpane test.

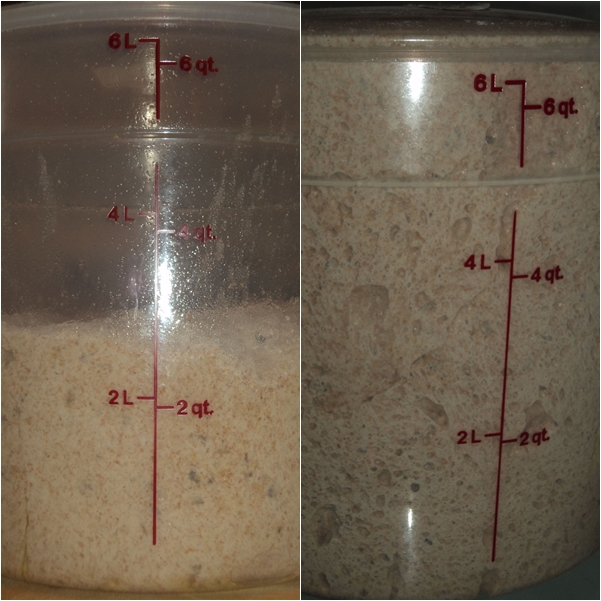
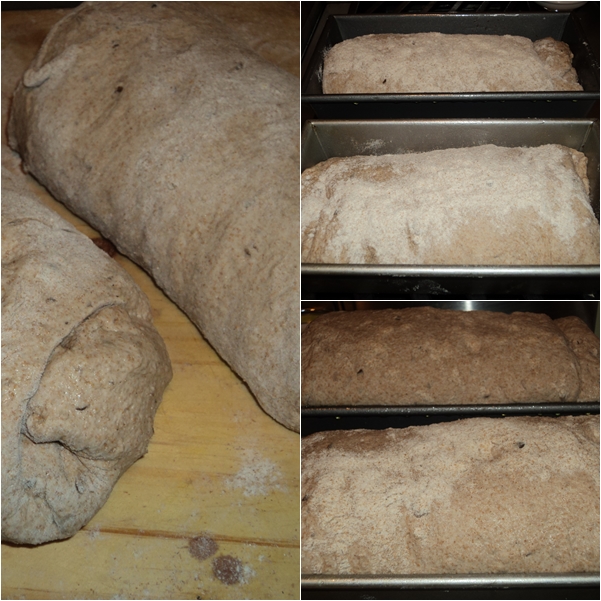
Place the dough in a bowl or rising bucket and allow it to rise once or twice. I slowed its fermentation by placing it in the refrigerator for six hours, but you can still see it’s rise…it almost popped the lid on the bucket.
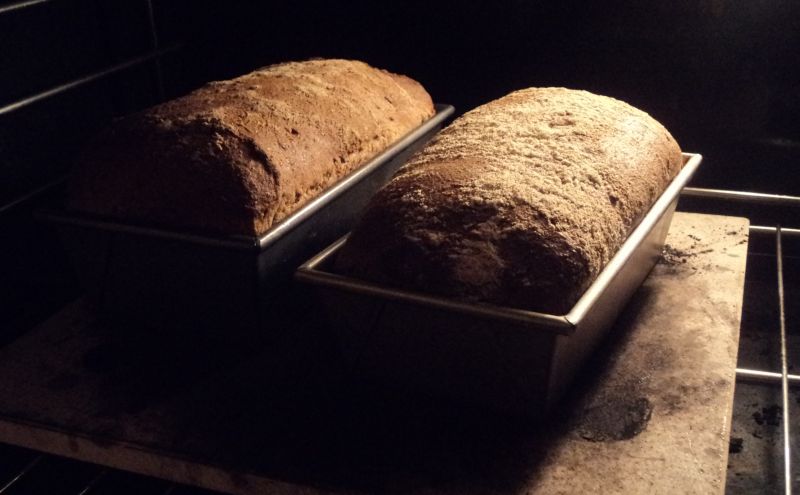
Portion and shape the dough. Place it into pans and allow it to rise.
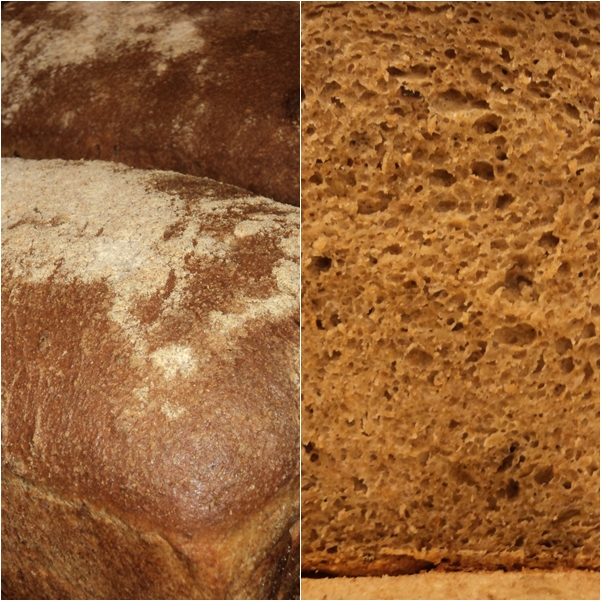
Bake the loaves for 30-40 minutes and then let them cool before slicing. You can see the nice open crumb and specks of grain. It is not necessary to grind the grain because most of it sort of mashes into the dough as it’s kneaded. It is as delicious as it looks. This bread makes excellent sandwiches and toast. Some say that it is nutritionally complete.
This post and the pictures may make it seem like this is a difficult or overly complicated bread to prepare…it’s not. It is as simple as any other bread with just a couple extra steps (mainly cooking the beans and grains). If you look at the recipe and break it down into steps or stages you will see that it is rather simple. I encourage you to try it…you will be glad that you did.
2 tablespoons white beans
2 tablespoons red beans
2 tablespoons lentils
2 tablespoons barley
2 tablespoons millet
2 tablespoons bulgur wheat
___________________
2 cups whole wheat flour
2 teaspoons instant yeast
___________________
4 cups whole wheat flour
1/4 cup olive oil
3 teaspoons sea salt
3 teaspoons instant yeast
Boil the grains in the water in logical succession according to cooking times: first the white and red beans (about 60 minutes), when they are soft add the, spelt berries, lentils, and barley (about 30 minutes); lastly, add the millet and bulgar (about 10 minutes). The key is that after each addition the previous grain must be soft enough so that when all of the grains are in the pot they will all be equally soft; undercooked grains (especially the beans) can really ruin this bread. And as the grains cook add more water to the pot as necessary because the cooking liquid, which is full of nutrients, will become part of the recipe (keeping a lid on the pot will slow it’s evaporation). After the grains are cooked allow them to cool in the liquid to room temperature, refrigerating if necessary. After the grains are cooled drain them, squeezing them with your hands or the back of a spoon, reserving the cooking liquid.
Turn the dough out onto a floured work surface and cut it into 2 or 3 pieces. Shape into loaves and place into lightly oiled pans. Loosely cover the loaves with plastic wrap and allow to ferment for 30-60 minutes, or until double in size and when gently touched with a fingertip an indentation remains.
Bake the breads for about 30-40 minutes, adding steam to the oven a few times (either with ice cubes or a spray bottle) and rotating the breads every ten minutes. The breads are done when they are dark brown and sound hollow when tapped upon. Remove the breads from their pans and allow them to cook on a wire rack for at least 10 minutes before slicing.

Well, I tried this today, but met with limited success. The first bowl with the grains, flour and yeast looked right. The second seemed strange. That amount of liquid nowhere near got the flour all moist. In fact I had to leave some flour dry on the sides as it would not mix in. When I did put all of it together, it rose well enough to twice its amount, but was terribly wet. After turning it out, I kept adding and adding flour, but it refused to become like a bread dough. Finally I just dumped it into pans and baked it. It did not rise in the oven very much. So I ended up with bread that tastes pretty good, really, but is dense and heavy. I'll try again. Any tips on why the mix would never get any less like a thick cake batter?
ljcurletta, Thanks for your comments. You are the second person who mentioned their dough was too wet. For my explanation of this please read my reply to Rose which is above your post (probably the grains need to be squeezed out more). Also, because you are the second person who said mentioned this, I plan on making the recipe tomorrow following my own directions exactly. To see the results look at the main page of this blog. Thanks for reading the blog and trying the recipes.
Well I used your recipe and it was the first time I had ever baked anything. I'm not a cook either by the way lol, but it turned out wonderful!!! I should have put more dough into the bread pans because they turned out more like a think browny then a loaf of bread but it taste and looks perfect.Thank you,Brad
Brad, Thanks for trying the recipe and letting me know how it turned out. It will get better (and easier) the more times you make it. If the dough is too loose add a bit more flour, and it does sound like you either need to add more dough to the pan or use smaller pans. Peace.
I make Ezekiel Bread following your previous (poolish) recipe regularly. Is is a nutritionally complete food, meaning it contains all the necessary amino acids. I love it and thank you for it.God told Ezekiel to eat twenty shekels a day (about 10 ounces) by weight, and to drink the sixth part of a hin (about 21 ounces) of water per day. Instead of a normal fast (water with no food), I frequently eat ten ounces of Ezekiel bread per day for three days. Substituting green tea for coffee enhances the flavor of the bread and adds to the benefits of the fast.Everything Ezekiel did was symbolic and related to his prophecy of the Babylonian siege of Jerusalem. During a siege wood for cooking could not be gathered outside the city walls. As a siege wears on the animals will have been eaten, so dung will not be available. God's instructions to make bread of seeds and beans, cook it over human dung, and drink little water are prophecies of the dire conditions the residents of Jerusalem will encounter. More will die by starvation and disease during the siege than by the ultimate destruction of the city.Thanks again for posting the recipe. By the way, I admire people who get about cities on bicycles.
Your blog is incredible, quite priceless. What temp is best to cook the bread (couldn't find it in any of the E. B. recipes)?
AU…Thanks for visiting and commenting; I'm glad that you enjoy the blog. Bake the bread at 350F. You can find the temp and directions at this post:http://citysimplicity.blogspot.com/2009/04/ezekiel-bread.html
Wow, this is the first homemade bread I have ever attempted. I followed the recipe – only I used a pressure cooker on the beans, etc., and I hand kneaded the dough. Man, it turned out so good. Amazing with honey or apple butter. And my wife is impressed. Thanks so much for sharing this.
Bll, Thanks…I'm glad the bread came out great. Always like to hear of people baking their own bread. Thanks for visiting and commenting.
Sorry to be another predictible blog visitor, but I too found this by a google search. I am inspired to try your recipe! Sounds not too complicated and hearty. Now I will look at some other pages of your blog 🙂