>Isaac and I rode up to Windmill Quarry last week. We took the Friendship Trail. Here’s a 12 second video of him taking his last jump of the season.
My New S.U.B (and how I built a stylish custom top deck for under twenty bucks)
 Well, I finally did it. After months of hemming and hawing (as to whether I should purchase another bike…this makes six), I finally did it. I ordered my Mundo Yuba. And I gotta say that it’s pretty exciting.
It was a little intimidating putting it together. I’m a pretty handy guy, but I’ve never put a bike together from scratch before, and that’s basically what you have to do. There are assembly instructions to download from their website, but if you’ve ever tinkered with bikes before you should be able to figure it out.
Anyhow, the Mundo weighs a ton (the website says it weighs 59 pounds, but it feels heavier than that to me), but the ride is incredible. It feels like a tank. The upright position offers extreme comfort. To some the length may seem a little awkward at first, but I’m used to it as one of my other bikes is a tandem. The gearing seems good, and once you get rolling you’d never know that you were on a longtail bike or that you may or may not be carrying a load. I own a trailer, but this is different. My trailer is great for smaller loads that may have a lot of loose items, such as groceries, but it is not suited to carry large, heavy, or bulky loads, such as lumber, for example.
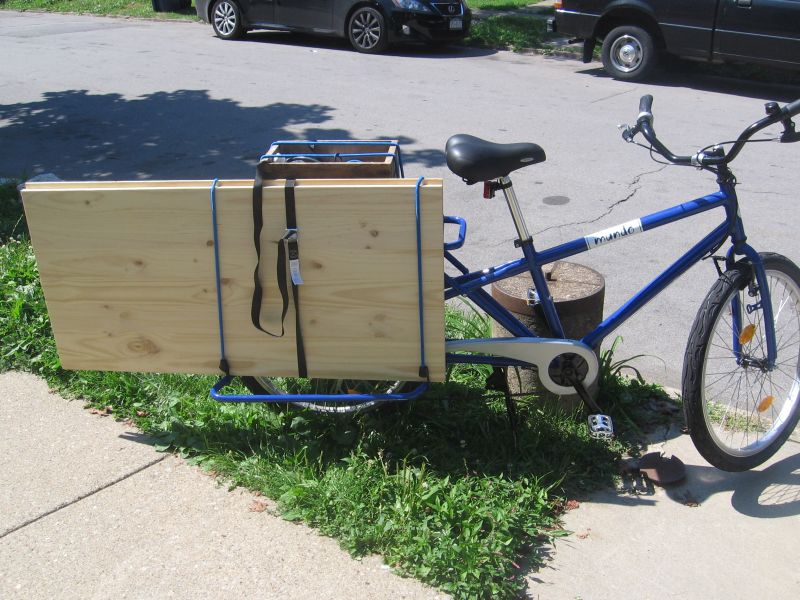
Here’s a couple pictures of my trial run today. On the right side of the bike are two sheets of wood measuring 2 by 4 feet each; one is a piece of plywood I used to make a top deck for the Mundo (see below) and the other is a 3/4 inch thick slab of solid pressed pine which I’m using as a kitchen counter.
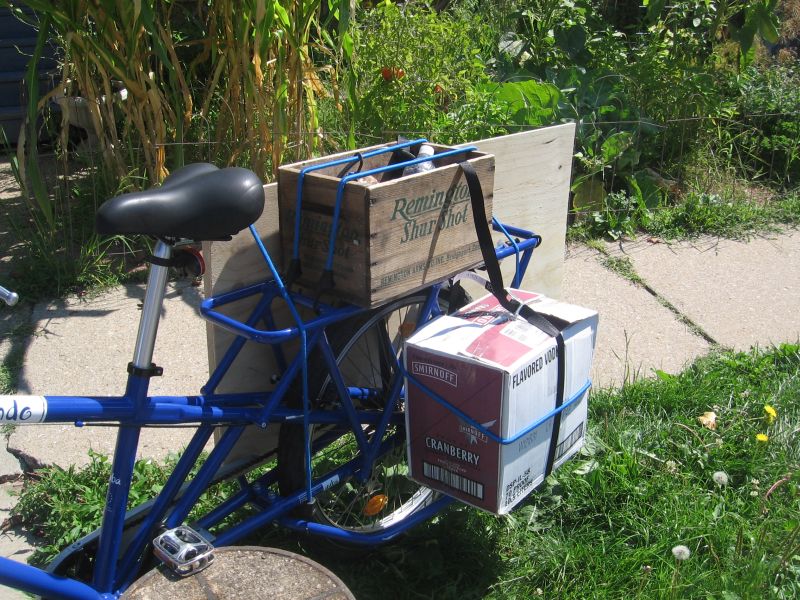
 Here’s a view of the left side. Though the box on the bottom runner looks like a case of vodka, it’s actually a mixed case of wine (hey, I get thirsty after a long ride), and as anyone knows, liquids are heavy. The box on top is serving as a sort of trunk for loose items…a few tools, a couple bottles of water (it was 85F and humid today), extra bungees, etc.
 I have to say, that the ride did not change that much with all that stuff loaded on: this bike is truly solid. Yes, of course, I was aware of the load, but it was pretty tightly strapped and I was careful of potholes. While my trailer may be better at hauling groceries, there’s no way it could have hauled this (and almost effortlessly). There was not sway, I banked like I normally would, etc. This bike is solid.
Anyhow, with that said, one thing that I feel should be standard with the bike is a top deck. Both the Kona Ute and Xtra Cycle come standard with one. But given that fact, and also that I have not ridden either of the aforementioned bikes, I still feel that the Mundo is not only stronger and more utilitarian, but also a better deal. Anyhow, I set out to build a top deck and did it for under twenty dollars.
I initially got some ideas from these pages: one and two. Both of these looked great and offered excellent ideas, but I wanted specific things. Firstly, I knew that I wanted a deck that did not look as if it were simply a board screwed to the frame, and secondly, I wanted to still be able to access not only the outside frame bars, but also the cross bars as well (for use with bungees). This is what I came up with:
I chose to use plywood over a solid board for a couple reasons. The main reason is the thickness. As previously mentioned I didn’t want it to look like just a board screwed to the bike, and part of the reason it would look like this is the thickness of the board. With plywood you have other options. I chose to use 3/8 inch thickness. The solid board will be stronger, but I really feel the plywood is fine because the crossbars on the bike are what really carry the brunt of the weight, not the deck. The deck is just there to keep things in place.
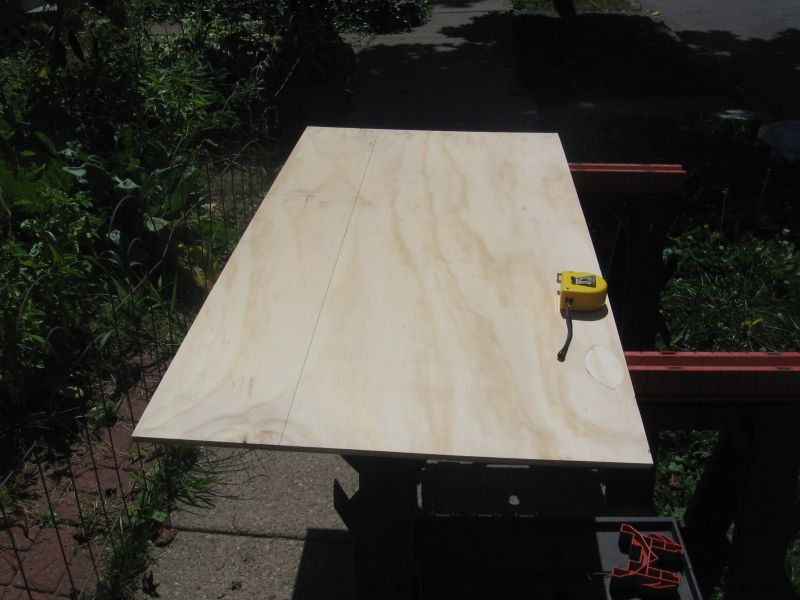
Anyhow, I hauled home the piece of wood and measured and penciled a section 7 by 30 inches. I cu t it to this size (which is slightly smaller than the rear rack) so that I would still have access to the frame for bungees.

 After determining that it was indeed the right size, I cut the corners off to match the shape of the rack.
 Then, using an electric sander, rounded them out, and sanded the entire thing smooth.
 Next I measured and traced both the top and bottom, so I knew where to cut the access holes and drill the mounts.

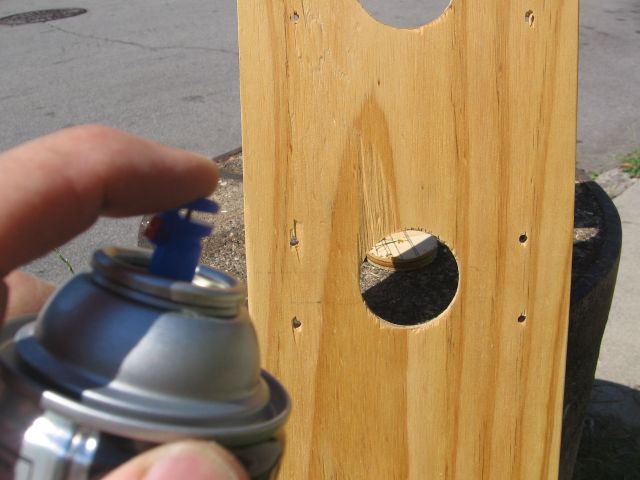
I then cut out 1 1/2 inch sections with a drill with a boring attachment (it’s the same attachment you use when installing a doorknob…it’s simple to do and the tool is inexpensive).

I crossed my fingers and placed the deck back on the bike…my measurements were correct, each hole was perfectly over a crossbar.
 Then I put 1/2 inch copper pipe mounts on the original measurements (you don’t have to use copper, I just like how it looks. Aluminium would work fine, as would plastic conduit mounts). I marked them and drilled holes for screws.

After drilling the holes I sanded and pencil markings off the deck and gave it a few coats of polyurethane to seal the wood…it dried in minutes in the hot sun.
 To mount the deck I used 8-32 x 3/4″ flat machine head screws. The heads recessed naturally into the wood, giving the surface of the deck a smooth finish.
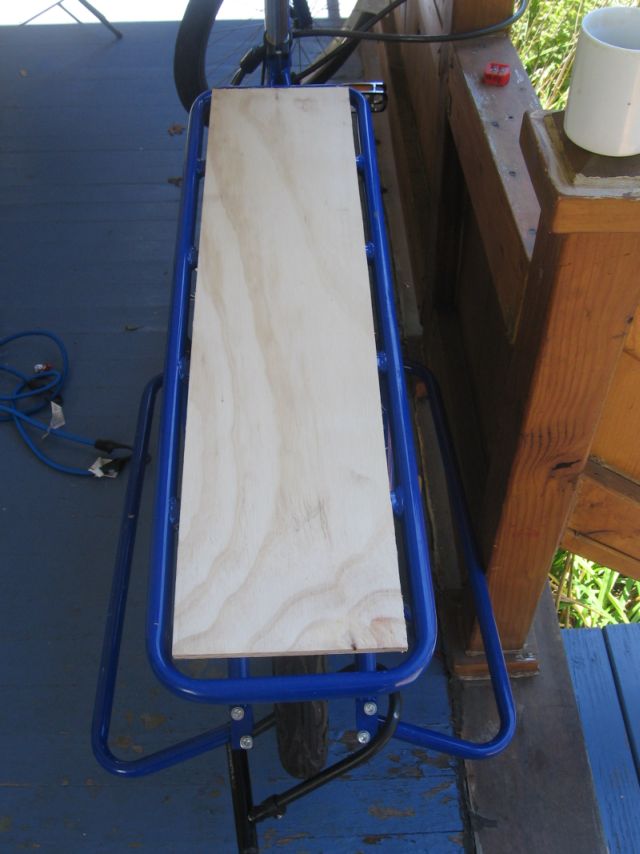
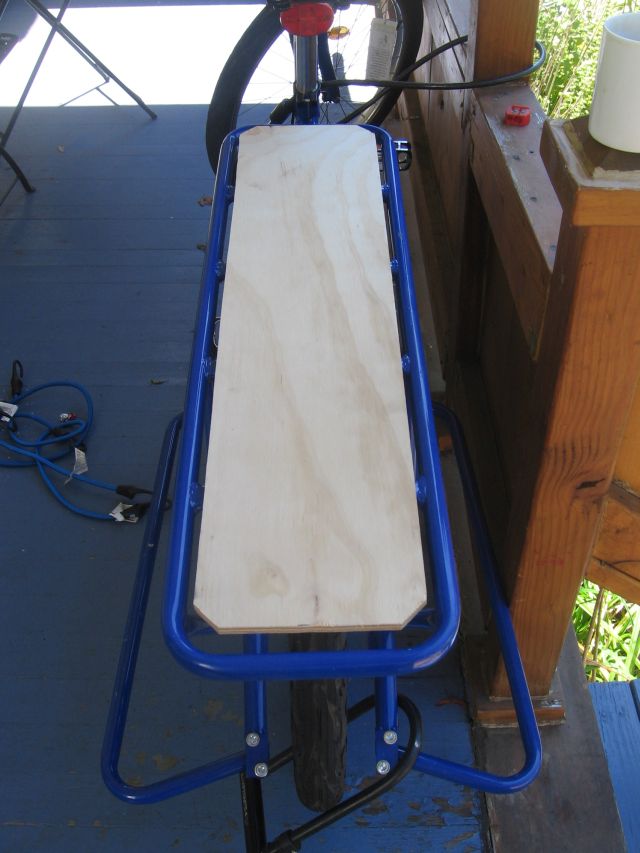
 Here’s the finished deck.
 Here’s a couple pictures of a crossbar and sidebar with a bungee attached…isn’t it awesome when things work out in real life like you plan them in your head.


>My New S.U.B (and how I built a stylish custom top deck for under twenty bucks)
>Well, I finally did it. After months of hemming and hawing (as to whether I should purchase another bike…this makes six), I finally did it. I ordered my Mundo Yuba. And I gotta say that it’s pretty exciting.
It was a little intimidating putting it together. I’m a pretty handy guy, but I’ve never put a bike together from scratch before, and that’s basically what you have to do. There are assembly instructions to download from their website, but if you’ve ever tinkered with bikes before you should be able to figure it out.
Anyhow, the Mundo weighs a ton (the website says it weighs 59 pounds, but it feels heavier than that to me), but the ride is incredible. It feels like a tank. The upright position offers extreme comfort. To some the length may seem a little awkward at first, but I’m used to it as one of my other bikes is a tandem. The gearing seems good, and once you get rolling you’d never know that you were on a longtail bike or that you may or may not be carrying a load. I own a trailer, but this is different. My trailer is great for smaller loads that may have a lot of loose items, such as groceries, but it is not suited to carry large, heavy, or bulky loads, such as lumber, for example.
Here’s a couple pictures of my trial run today. On the right side of the bike are two sheets of wood measuring 2 by 4 feet each; one is a piece of plywood I used to make a top deck for the Mundo (see below) and the other is a 3/4 inch thick slab of solid pressed pine which I’m using as a kitchen counter.
 Here’s a view of the left side. Though the box on the bottom runner looks like a case of vodka, it’s actually a mixed case of wine (hey, I get thirsty after a long ride), and as anyone knows, liquids are heavy. The box on top is serving as a sort of trunk for loose items…a few tools, a couple bottles of water (it was 85F and humid today), extra bungees, etc.
I have to say, that the ride did not change that much with all that stuff loaded on: this bike is truly solid. Yes, of course, I was aware of the load, but it was pretty tightly strapped and I was careful of potholes. While my trailer may be better at hauling groceries, there’s no way it could have hauled this (and almost effortlessly). There was not sway, I banked like I normally would, etc. This bike is solid.
Anyhow, with that said, one thing that I feel should be standard with the bike is a top deck. Both the Kona Ute and Xtra Cycle come standard with one. But given that fact, and also that I have not ridden either of the aforementioned bikes, I still feel that the Mundo is not only stronger and more utilitarian, but also a better deal. Anyhow, I set out to build a top deck and did it for under twenty dollars.
I initially got some ideas from these pages: one and two. Both of these looked great and offered excellent ideas, but I wanted specific things. Firstly, I knew that I wanted a deck that did not look as if it were simply a board screwed to the frame, and secondly, I wanted to still be able to access not only the outside frame bars, but also the cross bars as well (for use with bungees). This is what I came up with:
I chose to use plywood over a solid board for a couple reasons. The main reason is the thickness. As previously mentioned I didn’t want it to look like just a board screwed to the bike, and part of the reason it would look like this is the thickness of the board. With plywood you have other options. I chose to use 3/8 inch thickness. The solid board will be stronger, but I really feel the plywood is fine because the crossbars on the bike are what really carry the brunt of the weight, not the deck. The deck is just there to keep things in place.
Anyhow, I hauled home the piece of wood and measured and penciled a section 7 by 30 inches. I cu t it to this size (which is slightly smaller than the rear rack) so that I would still have access to the frame for bungees.
 After determining that it was indeed the right size, I cut the corners off to match the shape of the rack.
Then, using an electric sander, rounded them out, and sanded the entire thing smooth.
Next I measured and traced both the top and bottom, so I knew where to cut the access holes and drill the mounts.
I then cut out 1 1/2 inch sections with a drill with a boring attachment (it’s the same attachment you use when installing a doorknob…it’s simple to do and the tool is inexpensive).
I crossed my fingers and placed the deck back on the bike…my measurements were correct, each hole was perfectly over a crossbar.
Then I put 1/2 inch copper pipe mounts on the original measurements (you don’t have to use copper, I just like how it looks. Aluminium would work fine, as would plastic conduit mounts). I marked them and drilled holes for screws.
After drilling the holes I sanded and pencil markings off the deck and gave it a few coats of polyurethane to seal the wood…it dried in minutes in the hot sun.
To mount the deck I used 8-32 x 3/4″ flat machine head screws. The heads recessed naturally into the wood, giving the surface of the deck a smooth finish.
Here’s the finished deck.
Here’s a couple pictures of a crossbar and sidebar with a bungee attached…isn’t it awesome when things work out in real life like you plan them in your head.
Tomato Time
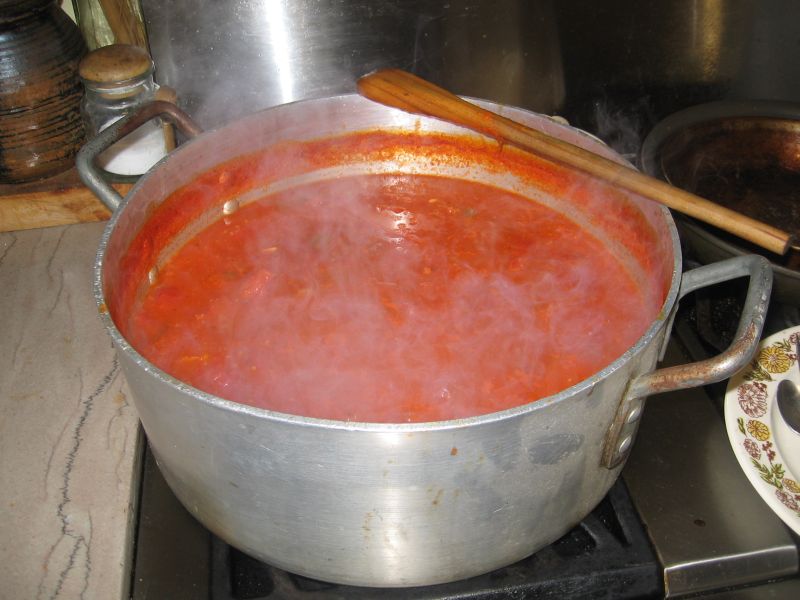
Tomatoes are my favorite garden vegetable to grow. They’re my favorite for a couple of reasons: firstly because I enjoy eating them raw or in almost any preparation, and secondly, after the initial planting they are almost worry free…give them sun and water and you’re guaranteed a good crop by August. At any rate, I always seem to plant too many and get a little overwhelmed when they all start to ripen at once…faster than I can consume them. So for the past 5 years or so I’ve started making a large batch of basic tomato sauce and freezing it, and it usually lasts most of the winter. The flavor is incredible. I usually season it lightly with onion, a couple peppers, garlic, salt, fennel, basil, and a little sugar. This way if I want to use it in another application (such as an Indian dish, or Cajun, or Lebanese) the flavors are mild enough that I can adapt it.
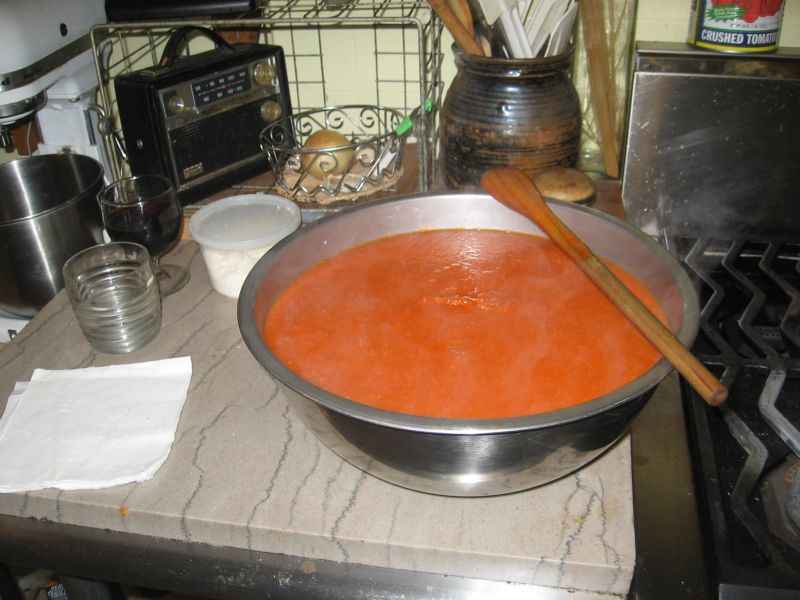
Anyhow, the process goes something like this: pick and wash the tomatoes, cut them into large pieces. I used to peel painstakingly peel them, but I found that using a blender the peels puree fine (and supposedly the skins are where most the nutrients reside). I then simmer them down in a large pot, add sauteed onions, garlic, and other seasonings, and puree it. The texture of a homemade sauce made with fresh tomatoes is so much different than that of canned tomatoes…it’s almost fluffy. I then package it and freeze it. Then when it’s in the middle of a bitter Buffalo winter I’m able to eat tomato sauce and remember the dog days of summer.


>Tomato Time
>Tomatoes are my favorite garden vegetable to grow. They’re my favorite for a couple of reasons: firstly because I enjoy eating them raw or in almost any preparation, and secondly, after the initial planting they are almost worry free…give them sun and water and you’re guaranteed a good crop by August. At any rate, I always seem to plant too many and get a little overwhelmed when they all start to ripen at once…faster than I can consume them. So for the past 5 years or so I’ve started making a large batch of basic tomato sauce and freezing it, and it usually lasts most of the winter. The flavor is incredible. I usually season it lightly with onion, a couple peppers, garlic, salt, fennel, basil, and a little sugar. This way if I want to use it in another application (such as an Indian dish, or Cajun, or Lebanese) the flavors are mild enough that I can adapt it.
Anyhow, the process goes something like this: pick and wash the tomatoes, cut them into large pieces. I used to peel painstakingly peel them, but I found that using a blender the peels puree fine (and supposedly the skins are where most the nutrients reside). I then simmer them down in a large pot, add sauteed onions, garlic, and other seasonings, and puree it. The texture of a homemade sauce made with fresh tomatoes is so much different than that of canned tomatoes…it’s almost fluffy. I then package it and freeze it. Then when it’s in the middle of a bitter Buffalo winter I’m able to eat tomato sauce and remember the dog days of summer.
Frontyard Corn
S0 it’s been three months since I’ve updated this blog. It seems that on the one hand I’ve had such a busy summer that I haven’t been able to get anything done (the checklist on my refrigerator that I wrote in the spring for a summer “to do List” does not have one single thing checked off), but on the other hand I can’t recall what has kept me so busy…and I thought this was a blog about living simply?
At any rate, the gardens are out of control again…by this time every year they turn into what I call my “savage gardens,” basically left to go wild…weeds and all. That, in fact, was one thing on my summer checklist: not to let the garden get out of control. Well, that never worked as planned. The one plant in particular that is doing well this year is the corn. Most of it is in the front yard…my neighbors probably think I’m nuts…it’s planted on either side of my walkway so in order to reach the front door you have to go through a mini cornfield…It’s a pretty neat feeling. Here’s a few photos:


>Frontyard Corn
>S0 it’s been three months since I’ve updated this blog. It seems that on the one hand I’ve had such a busy summer that I haven’t been able to get anything done (the checklist on my refrigerator that I wrote in the spring for a summer “to do List” does not have one single thing checked off), but on the other hand I can’t recall what has kept me so busy…and I thought this was a blog about living simply?
At any rate, the gardens are out of control again…by this time every year they turn into what I call my “savage gardens,” basically left to go wild…weeds and all. That, in fact, was one thing on my summer checklist: not to let the garden get out of control. Well, that never worked as planned. The one plant in particular that is doing well this year is the corn. Most of it is in the front yard…my neighbors probably think I’m nuts…it’s planted on either side of my walkway so in order to reach the front door you have to go through a mini cornfield…It’s a pretty neat feeling. Here’s a few photos:
Before and After
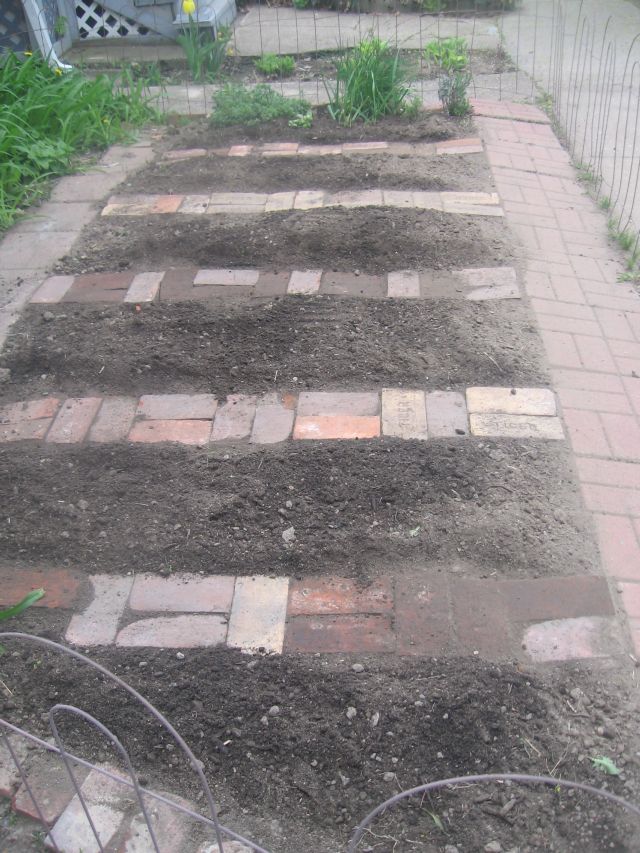
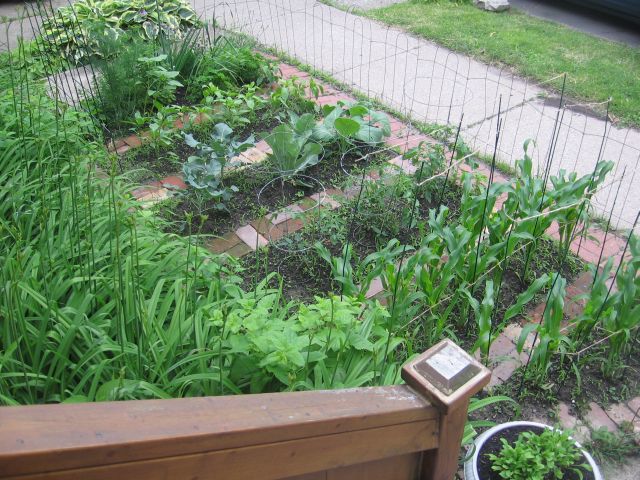
Between the early burst of hot and steamy weather, followed by two weeks of on again-and-off again torrential downpours, the garden is flourishing. Here are a few before and after photos. The first set were taken in early May, the second set just this week.
Here’s the garden in the front yard. I’m trying something a little different this year: separating small areas by bricks. This way I’ll micro-manage it, hopefully keeping weeds at bay.
This is the first year I’m attempting corn. It’s growing great! I have two small patches planted on either side of my front steps (about 36 plants in all). My plan is that by mid-summer I’ll walk through a “cornfield” to enter the house. Someone I work with told me that corn should be “knee-high by July.” I’m ahead of the game…some is thigh-high and it’s only June.


Here’s some of the plants before they were in the ground. The plants on the middle stairs are broccoli. Yesterday broccoli was one of the ingredients on my dinner table (and one of the first things–besides herbs–that I ate out of the garden this year).


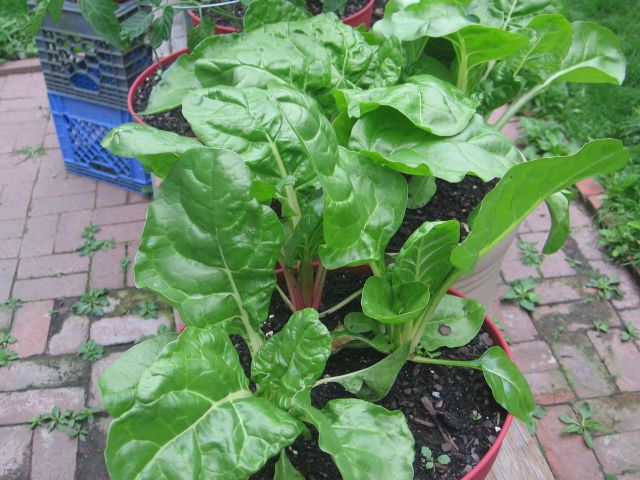
There’s also a garden in the back yard, but this year is the first year that I expanded into pots (I ran out of ground in my teeny city plot). The plants in pots are growing great. The problem is my two dogs…they seem to love these vegetables (their both pugs…they’ll eat anything). The garden itself is fenced off with chicken wire, but the pots are within their reach…I’ve already lost a few vegetable plants this year.
The first pot in the photo has Swiss chard in it just after planting, the next one is how it looks now…a portion of which became my dinner.

The first (mini) harvest of the season, then dinner. I look forward to tomatoes and peppers.


>Before and After
>Between the early burst of hot and steamy weather, followed by two weeks of on again-and-off again torrential downpours, the garden is flourishing. Here are a few before and after photos. The first set were taken in early May, the second set just this week.
Here’s the garden in the front yard. I’m trying something a little different this year: separating small areas by bricks. This way I’ll micro-manage it, hopefully keeping weeds at bay.
This is the first year I’m attempting corn. It’s growing great! I have two small patches planted on either side of my front steps (about 36 plants in all). My plan is that by mid-summer I’ll walk through a “cornfield” to enter the house. Someone I work with told me that corn should be “knee-high by July.” I’m ahead of the game…some is thigh-high and it’s only June.
Here’s some of the plants before they were in the ground. The plants on the middle stairs are broccoli. Yesterday broccoli was one of the ingredients on my dinner table (and one of the first things–besides herbs–that I ate out of the garden this year).
There’s also a garden in the back yard, but this year is the first year that I expanded into pots (I ran out of ground in my teeny city plot). The plants in pots are growing great. The problem is my two dogs…they seem to love these vegetables (their both pugs…they’ll eat anything). The garden itself is fenced off with chicken wire, but the pots are within their reach…I’ve already lost a few vegetable plants this year.
The first pot in the photo has Swiss chard in it just after planting, the next one is how it looks now…a portion of which became my dinner.
The first (mini) harvest of the season, then dinner. I look forward to tomatoes and peppers.
Gasicide

>Gasicide
>
Six Year Chart
Six years ago gas was a buck-and-a-half a gallon…and we thought that was pricey…better get that old bike out of the basement/garage…it’ll be more fun than you can imagine.

>Six Year Chart
>Six years ago gas was a buck-and-a-half a gallon…and we thought that was pricey…better get that old bike out of the basement/garage…it’ll be more fun than you can imagine.
An Open Letter To Gordon Ramsay
I tried, chef, I really did, and on numerous occasions. But I just can not sit through an entire episode of Hell’s Kitchen. Invariably, after or during one of your obscene and belittling rants, I tell you to shut the f#@k up, consciously using one of your favorite expletives.
Why do you do it, I wonder? It can’t be the money and fame because you seem to have had both before these shows began. You’re an extremely accomplished chef whose restaurants carry a combined total of something like 12 Michelin stars, and you’ve trained under some of the greatest of our time: Albert Roux, Guy Savoy, Joël Robuchon…these names read like a who’s who list of the culinary world. And let’s not forget Marco Pierre White, the original enfant terrible of the kitchen.
Don’t you see what you are doing? There will be a whole legion of young culinarians following behind you thinking this is how a chef is supposed to act, perpetuating the myth of the temperamental chef. This is a hard enough image to break in real life, but your on-screen persona takes it to a new level…you’ve become a caricature of a temperamental and belligerent chef. You’ve made a skewed reflection of our fine and noble profession. I really cannot believe that you don’t see this.
On one recent show, after you nearly brought a cook to tears she apologized to you saying she was sorry. Your response was that you were sorry too…you were sorry she was there. I recently read this quote by the poet, Maya Angelou: “I’ve learned that people will forget what you said, people will forget what you did, but people will never forget how you made them feel.”
Years from now that cook may not remember the actual words that you screamed at her, but she will undoubtedly remember how you made her feel. I cannot believe that your heart is so hardened that you would say this to a person (on television, nonetheless) and mean it.
Given the caliber of restaurants in which you’ve trained you know better than I the pressures a chef faces on a daily basis, and that we all “lose it” now and again, but you must also know that it is more effective to develop a strong team and teach and nurture, than it is to divide, intimidate, and pit one against the other. I’d guess that acting in a more caring and pedagogical manner probably would not bring high television ratings, but apparently screaming like a tyrannical lunatic does.
Being classically trained I’m sure you’re aware of the reputation of August Escoffier, a Frenchman by birth he spent more of his life on your home turf than his own. His shadow is just behind you every step you take in your hometown. Not only did he develop the brigade system, which we of course now call line cooking (the very same system that you use on your show), but he was also said to be a true gentleman in the kitchen. Supposedly, when he felt like he was going to lose his temper he would go for a walk, lest he lose his composure in front of his staff.
I recently saw a guy waiting in line in Starbucks actually wearing a chef’s jacket patterned after those on your show. My heart sank. It’s actually happening, I thought to myself…they’re idolizing him (you). Standing a few people behind him in queue I almost tapped him on the shoulder to ask him wear he worked, but I couldn’t bring myself to do it.
As you know, Marco Pierre White recently published a memoir, The Devil in the Kitchen, and he’s going to be starring in a British version of Hell’s Kitchen. I don’t know if hell exists or not, though you guys seem to be preoccupied with it. But if it does exist, I’m pretty sure it will entail working in your kitchen for all of eternity.
Shrimp Fra Diavolo
Yield: 4 portions
6 tablespoons olive oil, divided
1/2 small onion, diced
2 cloves garlic, minced
2 anchovy filets
1 teaspoon crushed red pepper
2 teaspoons minced parsley
1/2 teaspoon basil
1/2 teaspoon salt
2/3 cup red wine
2 cups tomato purée
1/2 pound linguine
1/2 pound large shrimp, peeled and cleaned
Heat 3 tablespoons olive oil in a small saucepot. Add the onion and garlic; sauté until translucent but not browned. Add the anchovies and hot pepper; sauté for 1 minute, mashing the anchovies with a wooden spoon. Stir in the parsley, basil, salt, and red wine. Simmer the wine for a couple of minutes, then add the tomato puree. Simmer the sauce slowly fore about 20 minutes. If the sauce becomes too thick thin it with a little water. While the sauce is simmering boil the pasta until al dente, rinse it and set aside.
Heat the remaining 3 tablespoon oil in a large skillet over high heat. Pat the shrimp dry and carefully add them to the skillet. Stir and toss the shrimp in the hot oil for a minute or two, then add the sauce. Lower the heat to a simmer and cook the shrimp for just a couple minutes. Make sure the pasta is drained well and add it to the sauce. Cook just long enough to reheat the pasta.
>An Open Letter To Gordon Ramsay
>
I tried, chef, I really did, and on numerous occasions. But I just can not sit through an entire episode of Hell’s Kitchen. Invariably, after or during one of your obscene and belittling rants, I tell you to shut the f#@k up, consciously using one of your favorite expletives.
Why do you do it, I wonder? It can’t be the money and fame because you seem to have had both before these shows began. You’re an extremely accomplished chef whose restaurants carry a combined total of something like 12 Michelin stars, and you’ve trained under some of the greatest of our time: Albert Roux, Guy Savoy, Joël Robuchon…these names read like a who’s who list of the culinary world. And let’s not forget Marco Pierre White, the original enfant terrible of the kitchen.
Don’t you see what you are doing? There will be a whole legion of young culinarians following behind you thinking this is how a chef is supposed to act, perpetuating the myth of the temperamental chef. This is a hard enough image to break in real life, but your on-screen persona takes it to a new level…you’ve become a caricature of a temperamental and belligerent chef. You’ve made a skewed reflection of our fine and noble profession. I really cannot believe that you don’t see this.
On one recent show, after you nearly brought a cook to tears she apologized to you saying she was sorry. Your response was that you were sorry too…you were sorry she was there. I recently read this quote by the poet, Maya Angelou: “I’ve learned that people will forget what you said, people will forget what you did, but people will never forget how you made them feel.”
Years from now that cook may not remember the actual words that you screamed at her, but she will undoubtedly remember how you made her feel. I cannot believe that your heart is so hardened that you would say this to a person (on television, nonetheless) and mean it.
Given the caliber of restaurants in which you’ve trained you know better than I the pressures a chef faces on a daily basis, and that we all “lose it” now and again, but you must also know that it is more effective to develop a strong team and teach and nurture, than it is to divide, intimidate, and pit one against the other. I’d guess that acting in a more caring and pedagogical manner probably would not bring high television ratings, but apparently screaming like a tyrannical lunatic does.
Being classically trained I’m sure you’re aware of the reputation of August Escoffier, a Frenchman by birth he spent more of his life on your home turf than his own. His shadow is just behind you every step you take in your hometown. Not only did he develop the brigade system, which we of course now call line cooking (the very same system that you use on your show), but he was also said to be a true gentleman in the kitchen. Supposedly, when he felt like he was going to lose his temper he would go for a walk, lest he lose his composure in front of his staff.
I recently saw a guy waiting in line in Starbucks actually wearing a chef’s jacket patterned after those on your show. My heart sank. It’s actually happening, I thought to myself…they’re idolizing him (you). Standing a few people behind him in queue I almost tapped him on the shoulder to ask him wear he worked, but I couldn’t bring myself to do it.
As you know, Marco Pierre White recently published a memoir, The Devil in the Kitchen, and he’s going to be starring in a British version of Hell’s Kitchen. I don’t know if hell exists or not, though you guys seem to be preoccupied with it. But if it does exist, I’m pretty sure it will entail working in your kitchen for all of eternity.
Shrimp Fra Diavolo
Yield: 4 portions
6 tablespoons olive oil, divided
1/2 small onion, diced
2 cloves garlic, minced
2 anchovy filets
1 teaspoon crushed red pepper
2 teaspoons minced parsley
1/2 teaspoon basil
1/2 teaspoon salt
2/3 cup red wine
2 cups tomato purée
1/2 pound linguine
1/2 pound large shrimp, peeled and cleaned
Heat 3 tablespoons olive oil in a small saucepot. Add the onion and garlic; sauté until translucent but not browned. Add the anchovies and hot pepper; sauté for 1 minute, mashing the anchovies with a wooden spoon. Stir in the parsley, basil, salt, and red wine. Simmer the wine for a couple of minutes, then add the tomato puree. Simmer the sauce slowly fore about 20 minutes. If the sauce becomes too thick thin it with a little water. While the sauce is simmering boil the pasta until al dente, rinse it and set aside.
Heat the remaining 3 tablespoon oil in a large skillet over high heat. Pat the shrimp dry and carefully add them to the skillet. Stir and toss the shrimp in the hot oil for a minute or two, then add the sauce. Lower the heat to a simmer and cook the shrimp for just a couple minutes. Make sure the pasta is drained well and add it to the sauce. Cook just long enough to reheat the pasta.
Chives: A Sign of Renewal
It’s an exciting time: I recently planted most of my garden, and despite the cold spring this year some of the herbs from last year are flourishing nicely. Besides the usual suspects (tomatoes, peppers, zucchini) I try to mix it up a little bit each year. Thus, I was so excited when I came across little corn plants at the market. I planted two dozen of them, most in my front yard. Their progress is noticeable just in the last few days. I’ve taken photos, and will photo document them as they grow…but stupidly I cannot find the cable to upload them to my computer…eventually.
Here’s an article with a few recipes that I recently wrote for Artvoice:
Sitting on my front porch sipping a glass of wine on one of the first truly s pring evenings of the season, I find myself staring in amazement. No, I’m not looking at the beautiful sunset or anything hokey like that, I’m contemplating a tiny chive plant that has survived yet another difficult Buffalo winter. It’s one of the first herbs I planted when I moved into this house six summers ago. It was originally just a few shoots connected to a small clump of root when I pushed it into the ground, but now each year it grows so large that I have to cut it back, lest it intrude on valuable real estate in my teeny garden. Each winter its roots hibernate under a blanket of snow, ice, and frozen ground, yet without fail the following spring it pushes back through the soil reaching for the sun, and grows bright green with beautiful purple blossoms.
The sixteenth century French monk, Brother Lawrence (born Nicholas Herman), had such a profound experience while staring at a barren tree on a bleak winter’s day — knowing that the tree stripped of it’s leaves and seemingly dead, would be renewed and blossom in the spring — that he had a religious vision, a conversion. He was eventually accepted into a monastery where he spent many years as head cook, and is said to have never lost that sense of awe.
Now I am in no way implying that I had such an intense revelation while staring at my little cluster of chives, nor is this what lead me to a life in the kitchen, but I couldn’t help but consider this: that even after the most brutal winters, each spring these delicate little shoots push through the hard soil and reach for the sun as if it’s their only purpose on this earth.
Along with onions, garlic, and other pungent shoots and bulbs (oddly including asparagus), chives are part of the allium, or lily family. Plants from this botanical family have had as much lore and controversy surrounding them as a film star: they’ve been said to be everything from a natural antibiotic, to hair growth tonic, and even vampire repellent. And while their more pungent cousins, garlic and onions, have been used as folk medicine for eons, chives are more often considered the refined, or subtle, family member. According to the late food writer, Waverley Root, in his encyclopedic book simply titled, Food, one John Randolph, “a gentleman of Virginia” (circa 1770), was a proponent of chives instead of onions. In his book, A Treatise on Gardening, he spoke of them surviving the harsh winters and also that unlike garlic and onions, “chives left no trace on the breath.” But the best part, I think (besides the fact that they don’t make you cry when you cut them), is their delicate onion flavor.
Chive and White Bean Hummus
Yield: 4 cups
1/2 cup lemon juice
1/4 cup water
1/4 cup minced chives
1 tablespoon fresh minced garlic
1 teaspoon salt
3 cups white beans, canned or cooked and rinsed
1 cup tahini
Combine the lemon juice, water, chives, garlic, and salt in the bowl of a food processor and process for a couple minutes. Add the beans and tahini and process until smooth. Transfer the hummus to a plate or shallow bowl and refrigerate for 1/2 hour. Just prior to serving sprinkle with paprika and extra virgin olive oil.
Pan Roast Salmon with Chive Beurre Blanc
Yield: 4 Servings
3 tablespoons olive oil
4 portions salmon
1/4 cup white wine
1/4 cup white wine vinegar
1/4 teaspoon salt
1/4 teaspoon white pepper
1/4 minced chives
1/4 pound chilled unsalted butter, cut into cubes
thin slices of lemon for garnish
Preheat an oven to 350F.
Heat the olive oil in an ovenproof skillet over high heat. When the oil is very hot carefully place the salmon in the skillet skin-side up. Cook the salmon for a minute or so, until it begins to brown, then turn it over and place the skillet in the oven. Roast the fish for about 7 minutes.
In a separate smaller skillet, combine the wine, vinegar, salt, and pepper. Bring to a boil and cook until just a couple tablespoons of liquid remains. Stir in the chives and remove the pan from the heat.
Remove the fish from the oven and transfer it to a serving platter. Return the sauce skillet to the heat and swirl in the butter a couple pieces at a time. When the last of the butter is almost melted, pour the sauce over the fish and garnish with lemon slices. This is best served immediately.
>Chives: A Sign of Renewal
>It’s an exciting time: I recently planted most of my garden, and despite the cold spring this year some of the herbs from last year are flourishing nicely. Besides the usual suspects (tomatoes, peppers, zucchini) I try to mix it up a little bit each year. Thus, I was so excited when I came across little corn plants at the market. I planted two dozen of them, most in my front yard. Their progress is noticeable just in the last few days. I’ve taken photos, and will photo document them as they grow…but stupidly I cannot find the cable to upload them to my computer…eventually.
Here’s an article with a few recipes that I recently wrote for Artvoice:
Sitting on my front porch sipping a glass of wine on one of the first truly s pring evenings of the season, I find myself staring in amazement. No, I’m not looking at the beautiful sunset or anything hokey like that, I’m contemplating a tiny chive plant that has survived yet another difficult Buffalo winter. It’s one of the first herbs I planted when I moved into this house six summers ago. It was originally just a few shoots connected to a small clump of root when I pushed it into the ground, but now each year it grows so large that I have to cut it back, lest it intrude on valuable real estate in my teeny garden. Each winter its roots hibernate under a blanket of snow, ice, and frozen ground, yet without fail the following spring it pushes back through the soil reaching for the sun, and grows bright green with beautiful purple blossoms.
The sixteenth century French monk, Brother Lawrence (born Nicholas Herman), had such a profound experience while staring at a barren tree on a bleak winter’s day — knowing that the tree stripped of it’s leaves and seemingly dead, would be renewed and blossom in the spring — that he had a religious vision, a conversion. He was eventually accepted into a monastery where he spent many years as head cook, and is said to have never lost that sense of awe.
Now I am in no way implying that I had such an intense revelation while staring at my little cluster of chives, nor is this what lead me to a life in the kitchen, but I couldn’t help but consider this: that even after the most brutal winters, each spring these delicate little shoots push through the hard soil and reach for the sun as if it’s their only purpose on this earth.
Along with onions, garlic, and other pungent shoots and bulbs (oddly including asparagus), chives are part of the allium, or lily family. Plants from this botanical family have had as much lore and controversy surrounding them as a film star: they’ve been said to be everything from a natural antibiotic, to hair growth tonic, and even vampire repellent. And while their more pungent cousins, garlic and onions, have been used as folk medicine for eons, chives are more often considered the refined, or subtle, family member. According to the late food writer, Waverley Root, in his encyclopedic book simply titled, Food, one John Randolph, “a gentleman of Virginia” (circa 1770), was a proponent of chives instead of onions. In his book, A Treatise on Gardening, he spoke of them surviving the harsh winters and also that unlike garlic and onions, “chives left no trace on the breath.” But the best part, I think (besides the fact that they don’t make you cry when you cut them), is their delicate onion flavor.
Chive and White Bean Hummus
Yield: 4 cups
1/2 cup lemon juice
1/4 cup water
1/4 cup minced chives
1 tablespoon fresh minced garlic
1 teaspoon salt
3 cups white beans, canned or cooked and rinsed
1 cup tahini
Combine the lemon juice, water, chives, garlic, and salt in the bowl of a food processor and process for a couple minutes. Add the beans and tahini and process until smooth. Transfer the hummus to a plate or shallow bowl and refrigerate for 1/2 hour. Just prior to serving sprinkle with paprika and extra virgin olive oil.
Pan Roast Salmon with Chive Beurre Blanc
Yield: 4 Servings
3 tablespoons olive oil
4 portions salmon
1/4 cup white wine
1/4 cup white wine vinegar
1/4 teaspoon salt
1/4 teaspoon white pepper
1/4 minced chives
1/4 pound chilled unsalted butter, cut into cubes
thin slices of lemon for garnish
Preheat an oven to 350F.
Heat the olive oil in an ovenproof skillet over high heat. When the oil is very hot carefully place the salmon in the skillet skin-side up. Cook the salmon for a minute or so, until it begins to brown, then turn it over and place the skillet in the oven. Roast the fish for about 7 minutes.
In a separate smaller skillet, combine the wine, vinegar, salt, and pepper. Bring to a boil and cook until just a couple tablespoons of liquid remains. Stir in the chives and remove the pan from the heat.
Remove the fish from the oven and transfer it to a serving platter. Return the sauce skillet to the heat and swirl in the butter a couple pieces at a time. When the last of the butter is almost melted, pour the sauce over the fish and garnish with lemon slices. This is best served immediately.
Kibbee and Rice
Kibbee is a traditional Lebanese dish that can be eaten baked, fried, or (yikes!) raw. It’s a mixture of lamb (sometimes I use beef), bulgar wheat and spices. When I was a kid I would gobble this stuff down raw…not any more…too risky today with food born illness. Anyhow, I did my own variation by forming the mixture into meatballs and cooking it with rice and toasted spaghetti (the original rice-a-roni. I love cooking rice with these seasonings because the aroma permeates the whole house. Here’s How I made it:

Soak a handful of bulgar in warm water for 1/2 hour, then squeeze it out. Add it to a bowl with either lean ground beef or lamb, minced onion, garlic, hot pepper, and a pinch each of ground cumin, cinnamon, allspice, salt, and pepper.

Then mix in some chopped flat leaf parsley and fresh mint. Here’s an image of the first thing I was able to pick from my garden this year: mint (and it’s only May in Buffalo).

Shape the mixture into meatballs.

Heat a large skillet with olive oil and brown the meatballs on all sides.
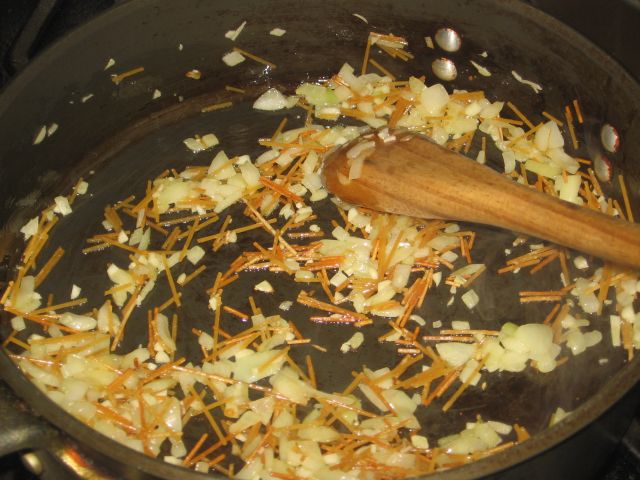
Heat a separate pan with olive oil, then add broken pieces of uncooked spaghetti, diced onion, and minced garlic. Cook until everything begins to brown (take care not to burn the garlic). When things just begin to brown add a pinch each of cumin, allspice, cinnamon, salt and pepper. Stir it then add a cup of rice. Stir the rice to coat it with the oil and spices. Then add two cups of chicken broth. Lower the heat to a simmer then add the meatballs to the liquid. Cover the pan and simmer the rice for 18 minutes. Remove the pan from the heat and allow it to rest, covered, for 5 minutes before serving.
>Kibbee and Rice
>Kibbee is a traditional Lebanese dish that can be eaten baked, fried, or (yikes!) raw. It’s a mixture of lamb (sometimes I use beef), bulgar wheat and spices. When I was a kid I would gobble this stuff down raw…not any more…too risky today with food born illness. Anyhow, I did my own variation by forming the mixture into meatballs and cooking it with rice and toasted spaghetti (the original rice-a-roni. I love cooking rice with these seasonings because the aroma permeates the whole house. Here’s How I made it:
Soak a handful of bulgar in warm water for 1/2 hour, then squeeze it out. Add it to a bowl with either lean ground beef or lamb, minced onion, garlic, hot pepper, and a pinch each of ground cumin, cinnamon, allspice, salt, and pepper.
Then mix in some chopped flat leaf parsley and fresh mint. Here’s an image of the first thing I was able to pick from my garden this year: mint (and it’s only May in Buffalo).
Shape the mixture into meatballs.
Heat a large skillet with olive oil and brown the meatballs on all sides.
Heat a separate pan with olive oil, then add broken pieces of uncooked spaghetti, diced onion, and minced garlic. Cook until everything begins to brown (take care not to burn the garlic). When things just begin to brown add a pinch each of cumin, allspice, cinnamon, salt and pepper. Stir it then add a cup of rice. Stir the rice to coat it with the oil and spices. Then add two cups of chicken broth. Lower the heat to a simmer then add the meatballs to the liquid. Cover the pan and simmer the rice for 18 minutes. Remove the pan from the heat and allow it to rest, covered, for 5 minutes before serving.
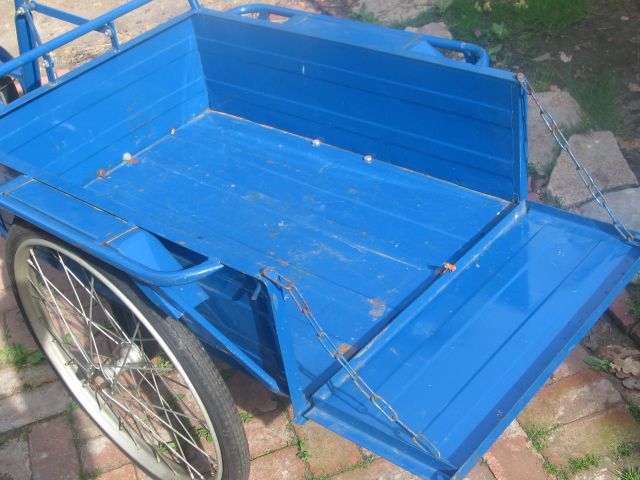
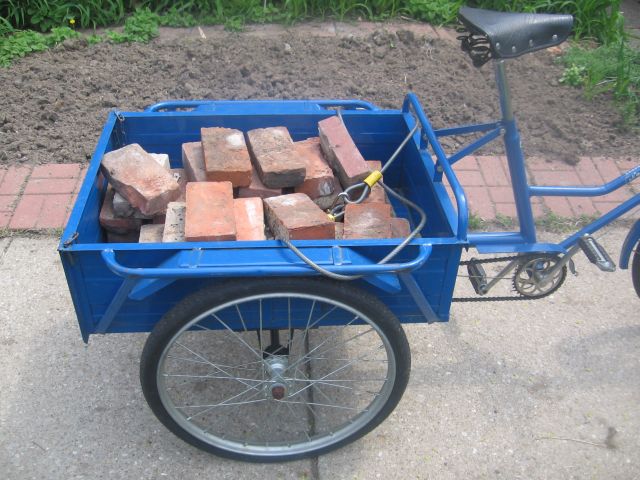
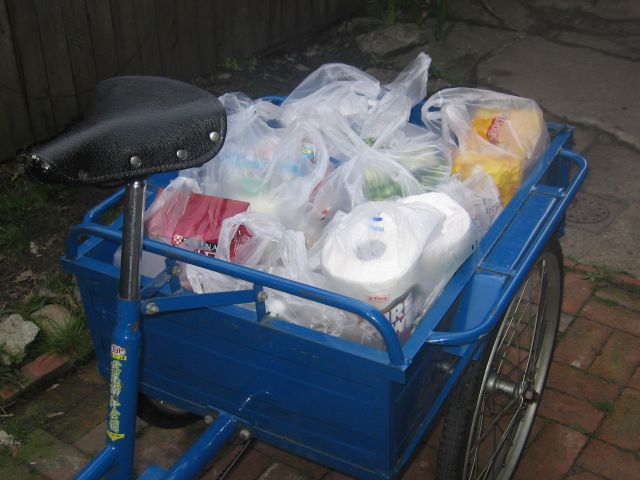
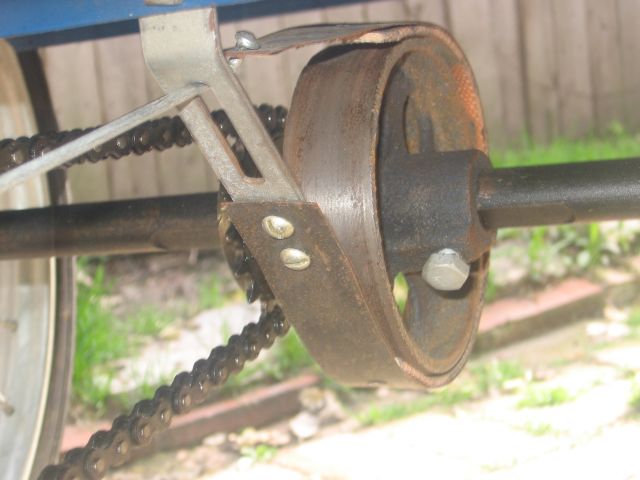
New Chinese Trike
I found this used Chinese trike on craigslist about a week ago and bought it on the spot. It’s more of a novelty than anything, but it’s a real workhorse. It’s geared low and the maximum speed is probably like 5mph, but that’s not a bad thing because the brake system sucks, to put it mildly (one of the photos shows this…a leather strap that is pulled tight around a drum on the axle). It’s precarious to ride, and takes some getting used to…the looks and comments I get are interesting. As one might expect it can really carry stuff…here’s some pictures: one is with a weeks worth of groceries (with plenty of room to spare), one is where I have it loaded with 4 bags of topsoil (40 pounds each), and yet another loaded down with bricks for my garden. The real problem with the brakes (or lack there of) comes to full reality when trying to stop a trike loaded with bricks or 160 pounds of dirt. But that’s also what makes it interesting…it’s a fun bike to ride. This trike is just one more reason not to use my gas guzzling vehicle.