
Last Days of Summer
Random Thoughts On Cooking, Bike Riding, and The Sacred Journey of Everyday Life

.
.

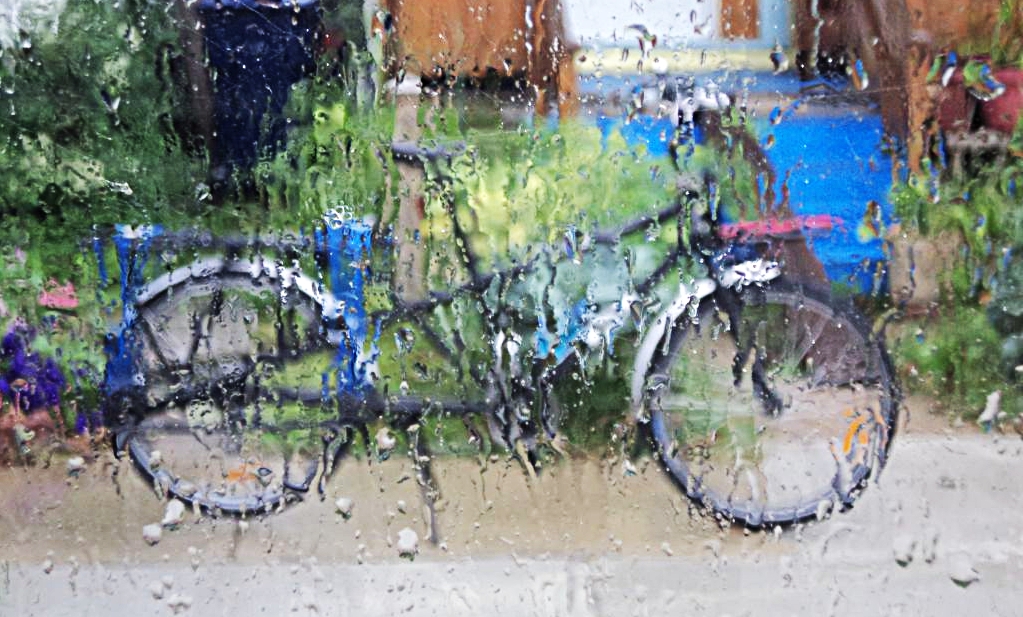
I didn’t intend on this, it just sort of happened (does that make it even more Zen?). The pool is closed this week for yearly maintenance (swimming is my primary exercise, besides biking, of course) and when I don’t get physical exercise on a semi-daily basis I start feeling antsy and annoyed (and I’m likely annoying to be around). I had planned on going for a power ride (ie, fast) on the Mundo purely for aerobic exercise, and being out of work early today thought I’d fit in a quick yoga/meditation session. Anyhow, when I originally left work it was beautiful and sunny (the reason I thought of the bike ride), but after my meditation session it was starting to rain…not hard, just starting. I had a route planned in my head, which I know is about 5 miles, and thought the worst that could happen is I’d get wet…and get wet I did. About 1/2 mile into it the clouds opened up and it came down in buckets. I was already wet so I kept going. It was one of those rare times when being on a bike in the rain (my least favorite element to ride in…I’ll take snow over rain any day) rather than fight it I surrendered to it. Maybe it was that I had just practiced a few basic asanas and followed it with meditation, or that my mantra was still at the forefront of my consciousness…but with the risk of sounding hokey, it was a spiritual experience. A good portion of my ride was along Lasalle Park, which runs along the eastern most edge of Lake Erie. I could see that it was a lake effect storm (regionalized) because while I was being pelted with rain I could see that the sun was splaying out in three directions across the lake. The scene through my rain-soaked eyes was beautiful…rain coming down in sheets but sunshine shimmering behind it as if the rain were a sort of veil. I felt as if I were getting washed far deeper than skin level. And I’ll add this…if you ever want to get a good workout, a true aerobic workout, ride a really heavy bike into a really strong headwind during a really heavy rain storm. You’ll get a workout and you’ll also have no other option but to surrender to it.
I didn’t intend on this, it just sort of happened (does that make it even more Zen?). The pool is closed this week for yearly maintenance (swimming is my primary exercise, besides biking, of course) and when I don’t get physical exercise on a semi-daily basis I start feeling antsy and annoyed (and I’m likely annoying to be around). I had planned on going for a power ride (ie, fast) on the Mundo purely for aerobic exercise, and being out of work early today thought I’d fit in a quick yoga/meditation session. Anyhow, when I originally left work it was beautiful and sunny (the reason I thought of the bike ride), but after my meditation session it was starting to rain…not hard, just starting. I had a route planned in my head, which I know is about 5 miles, and thought the worst that could happen is I’d get wet…and get wet I did. About 1/2 mile into it the clouds opened up and it came down in buckets. I was already wet so I kept going. It was one of those rare times when being on a bike in the rain (my least favorite element to ride in…I’ll take snow over rain any day) rather than fight it I surrendered to it. Maybe it was that I had just practiced a few basic asanas and followed it with meditation, or that my mantra was still at the forefront of my consciousness…but with the risk of sounding hokey, it was a spiritual experience. A good portion of my ride was along Lasalle Park, which runs along the eastern most edge of Lake Erie. I could see that it was a lake effect storm (regionalized) because while I was being pelted with rain I could see that the sun was splaying out in three directions across the lake. The scene through my rain-soaked eyes was beautiful…rain coming down in sheets but sunshine shimmering behind it as if the rain were a sort of veil. I felt as if I were getting washed far deeper than skin level. And I’ll add this…if you ever want to get a good workout, a true aerobic workout, ride a really heavy bike into a really strong headwind during a really heavy rain storm. You’ll get a workout and you’ll also have no other option but to surrender to it.

More specifically, these are my new fender stickers…got them today at the WNY Peace Center booth while walking through the Elmwood Festival of the Arts.
More specifically, these are my new fender stickers…got them today at the WNY Peace Center booth while walking through the Elmwood Festival of the Arts.
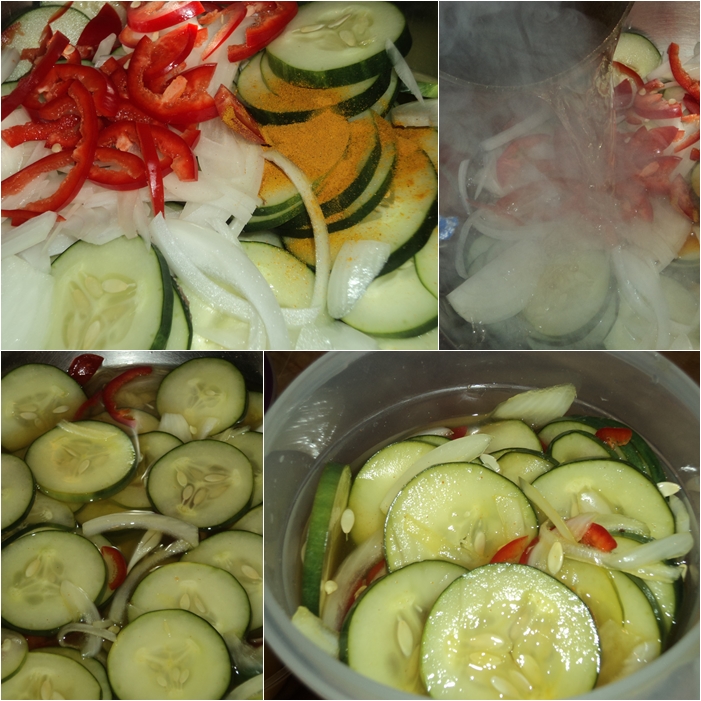
A next door neighbor gave me a few cucumbers and hot peppers today. Still having a couple cucumbers hanging on their vines I wanted to preserve these so I made a quick batch of refrigerator pickles. These are so easy to make (and you can make them with almost any vegetable). Combine the vegetables and spices in a bowl, make a sweet-and-sour brine, bring it to a boil and pour it over the vegetables. The cucumbers will last about a month like this in the refrigerator. Click here for a recipe (not mine or the one I used but it looks pretty good). The recipe says not to eat them for 4 days but you can start eating them within an hour…I did.
A next door neighbor gave me a few cucumbers and hot peppers today. Still having a couple cucumbers hanging on their vines I wanted to preserve these so I made a quick batch of refrigerator pickles. These are so easy to make (and you can make them with almost any vegetable). Combine the vegetables and spices in a bowl, make a sweet-and-sour brine, bring it to a boil and pour it over the vegetables. The cucumbers will last about a month like this in the refrigerator. Click here for a recipe (not mine or the one I used but it looks pretty good). The recipe says not to eat them for 4 days but you can start eating them within an hour…I did.

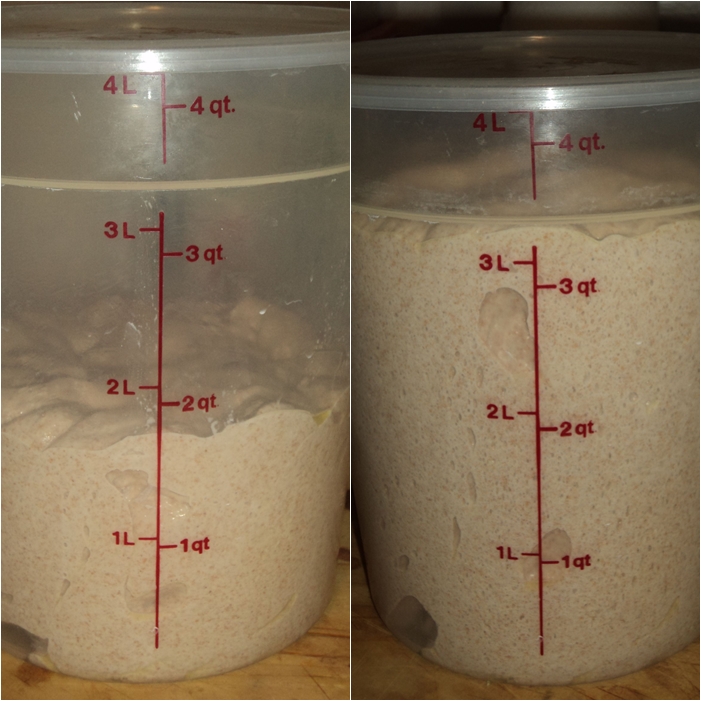
Today was the first time I’ve baked bread at home in probably two months. This is mostly because it has been so hot this summer I didn’t want to heat up the kitchen. My kitchen at work is already hot so I’ve been baking it there (making the dough at home and carrying it to-and-fro on my bike); a pretty good situation. Anyhow, today the high temp outside was only about 70F/21C so I made some at home.
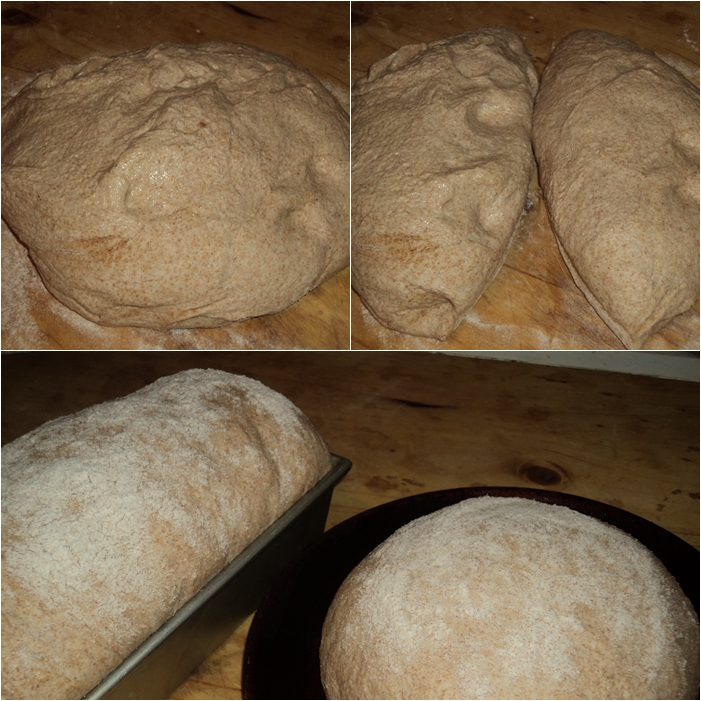
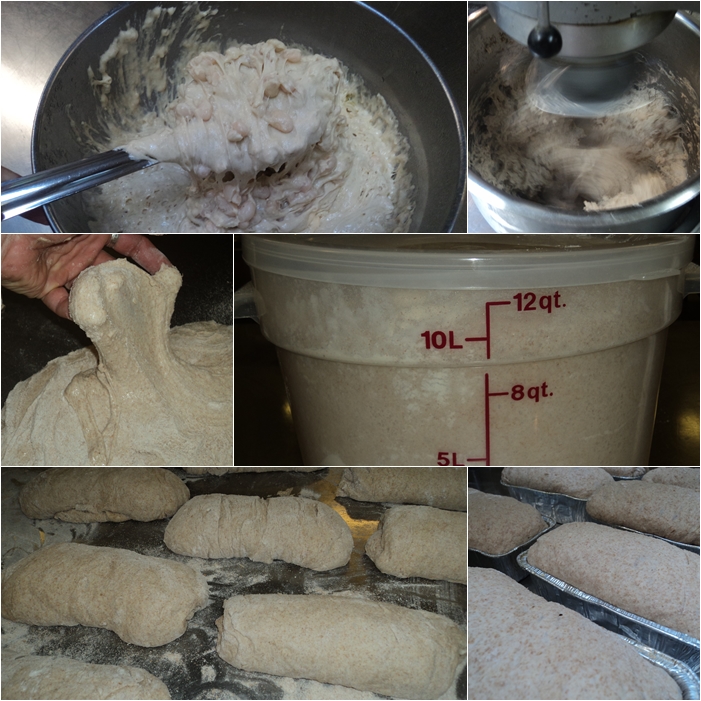
The loaves you see pictured are about as basic as you can get. Truly delicious, but basic. All whole wheat flour and a few other ingredients. If you learn to make this recipe you’ll be able to make a seemingly endless amount of variations. Most of my whole wheat bread recipes are based on this one. Here it is in pictures; a recipe follows.
Place two bowls side-by-side, one larger than the other. The smaller bowl will hold your pre-ferment and the larger your autolyse (the recipe tells you how to do this).

Next you’ll combine all the ingredients and mix the dough until it passes the windowpane test.

Place the dough in a bowl or rising bucket and allow it to ferment and rise until twice it’s original size.
Next, portion and shape the dough; allowing it to rise and ferment again.
Lastly–and this is the best part–bake the bread until dark-golden brown (wait 10 minutes before slicing).

Bake the breads for about 30-40 minutes, adding steam to the oven a few times (either with ice cubes or a spray bottle) and rotating the breads every ten minutes. The breads are done when they are dark brown and sound hollow when tapped upon. Remove the breads from their pans and allow them to cook on a wire rack for at least 10 minutes before slicing.
Today was the first time I’ve baked bread at home in probably two months. This is mostly because it has been so hot this summer I didn’t want to heat up the kitchen. My kitchen at work is already hot so I’ve been baking it there (making the dough at home and carrying it to-and-fro on my bike); a pretty good situation. Anyhow, today the high temp outside was only about 70F/21C so I made some at home.
The loaves you see pictured are about as basic as you can get. Truly delicious, but basic. All whole wheat flour and a few other ingredients. If you learn to make this recipe you’ll be able to make a seemingly endless amount of variations. Most of my whole wheat bread recipes are based on this one. Here it is in pictures; a recipe follows.
Place two bowls side-by-side, one larger than the other. The smaller bowl will hold your pre-ferment and the larger your autolyse (the recipe tells you how to do this).

Next you’ll combine all the ingredients and mix the dough until it passes the windowpane test.

Place the dough in a bowl or rising bucket and allow it to ferment and rise until twice it’s original size.
Next, portion and shape the dough; allowing it to rise and ferment again.
Lastly–and this is the best part–bake the bread until dark-golden brown (wait 10 minutes before slicing).
Bake the breads for about 30-40 minutes, adding steam to the oven a few times (either with ice cubes or a spray bottle) and rotating the breads every ten minutes. The breads are done when they are dark brown and sound hollow when tapped upon. Remove the breads from their pans and allow them to cook on a wire rack for at least 10 minutes before slicing.

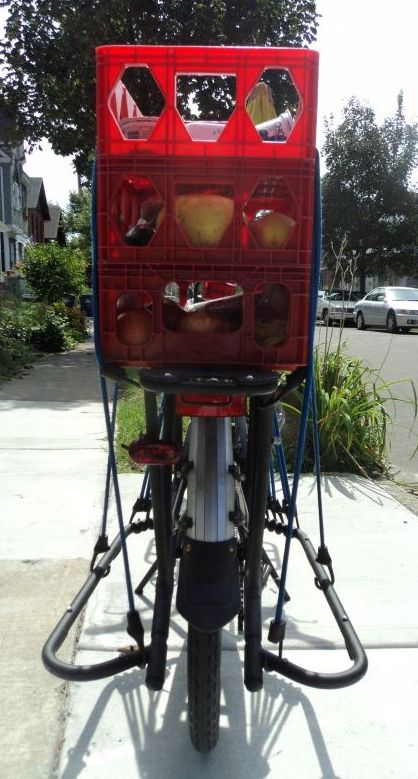
Three plastic soda crates full of groceries.
And a quick note: First ride with the new tires (installed them this morning)…nice, it’s amazing the difference in good quality tires (much noticeable reduced rolling resistance).

Three plastic soda crates full of groceries.
And a quick note: First ride with the new tires (installed them this morning)…nice, it’s amazing the difference in good quality tires (much noticeable reduced rolling resistance).
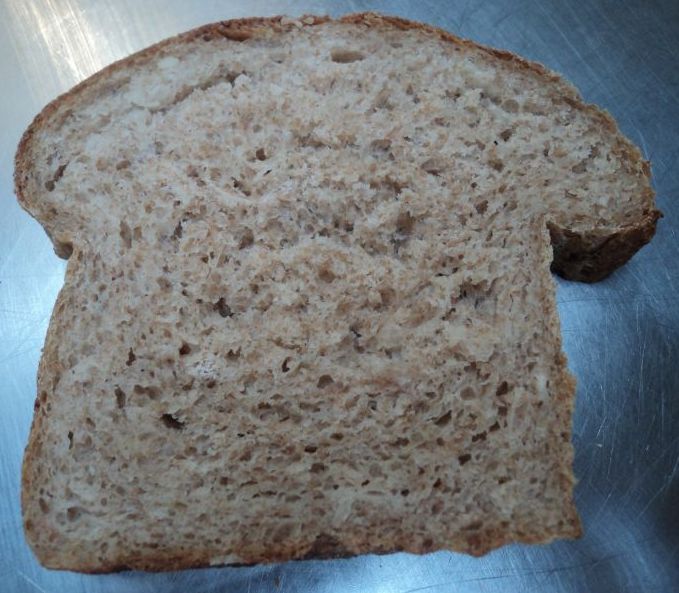
OK, so if you’ve been to this blog before you probably realize a few things–that I like cooking, bread making, and bike riding–but also that I have sort of eclectic tastes, meaning I have never really been one to stay “inside the box.” Anyhow, this is a good segue to this rather odd-sounding bread recipe (which is actually very delicious and economical)…
Whole Wheat Spelt Bread with White Beans and Maple
Don’t laugh; it’s delicious and nutritious. It’s the outcrop of having soaked too many beans for this soup recipe the other day. I boiled the extra beans in plain water, reserving the liquid, and made bread in the same way I make Ezekiel Bread (click here, here, or here), and substituting maple syrup in place of honey. The beans become part of the dough and are barely visible, but they add flavor and texture…actually making the dough a little lighter in some way. The maple is only mildly noticeable, but it does add a sweetness to the bread. It’ll make great toast for breakfast tomorrow that’s for sure (and probably a tomato sandwich for lunch). Anyhow, here it is in pictures; the recipe is below.
Bake the breads for about 30-40 minutes, adding steam to the oven a few times (either with ice cubes or a spray bottle) and rotating the breads every ten minutes. The breads are done when they are dark brown and sound hollow when tapped upon. Remove the breads from their pans and allow them to cook on a wire rack for at least 10 minutes before slicing.

A few days ago I noticed one of my cornstalks was either knocked or pulled down, and it looked like it was partially eaten. It annoyed me but I brushed it off thinking it was some neighbor kids who pulled it out and a rat nibbled on the fallen stalk. Well, it’s been going on for the past three nights now (I figured it wasn’t neighbor kids after the first night), and it’s gotten progressivly worse. I only grew about 20 stalks this year so it doesn’t take much to wipe out the entire crop. At present there are two left…I figure they are goners tonight. Anyhow, a neighbor (not one of the kids; an adult) told me he saw a city raccoon down the street the other night; I hadn’t seen one in the city in a while. Anyhow, as I was talking to him–and we were following the trail of corn debris across my front yard and another neighbors–he noticed some up in the tree. Yup, definitely a raccoon. I’ve grown a garden in the front yard for the past 9 years (here’s one of my favorite pictures of the corn) and have endoured everything from rabbits, homeless people, and even giant tomato-eating slugs…but now raccoons. I have visions of me turning into Old (urban) Farmer Joe…sitting on my front porch with a glass of wine and a slingshot. I wonder what raccoon tastes like…
A few days ago I noticed one of my cornstalks was either knocked or pulled down, and it looked like it was partially eaten. It annoyed me but I brushed it off thinking it was some neighbor kids who pulled it out and a rat nibbled on the fallen stalk. Well, it’s been going on for the past three nights now (I figured it wasn’t neighbor kids after the first night), and it’s gotten progressivly worse. I only grew about 20 stalks this year so it doesn’t take much to wipe out the entire crop. At present there are two left…I figure they are goners tonight. Anyhow, a neighbor (not one of the kids; an adult) told me he saw a city raccoon down the street the other night; I hadn’t seen one in the city in a while. Anyhow, as I was talking to him–and we were following the trail of corn debris across my front yard and another neighbors–he noticed some up in the tree. Yup, definitely a raccoon. I’ve grown a garden in the front yard for the past 9 years (here’s one of my favorite pictures of the corn) and have endoured everything from rabbits, homeless people, and even giant tomato-eating slugs…but now raccoons. I have visions of me turning into Old (urban) Farmer Joe…sitting on my front porch with a glass of wine and a slingshot. I wonder what raccoon tastes like…

I came across this and thought it was interesting enough to share; it’s from 1919. What I found really interesting is what the advert says on the left-hand side of the page, about halfway down (click the image; you may still need to enlarge it to read it). It states, “Ride a Bicycle. Physical fitness will safeguard the Peace, Health, and Prosperity of our Nation. The Bicycle is a health-builder, a time and money saver.” Did I mention that this ad is nearly 100 years old. Hmm…

