>

Random Thoughts On Cooking, Bike Riding, and The Sacred Journey of Everyday Life
>

A gym bag full of wet clothes, 3 liters of red wine, groceries, sundries, and other necessities.
>
A gym bag full of wet clothes, 3 liters of red wine, groceries, sundries, and other necessities.


This time of year when I see flowers poking up through the still-brown leaves and other debris from winter they look especially beautiful to me…almost illuminated against their drab backdrop. I snapped a few closeups today of flowers growing in my neighbor’s front yard. The two below I find particularly interesting…I didn’t realize it when I was taking the photos–just concentrating on holding the camera steady–but if you look close you can see a little bug staring back at me (click any for a larger view).

>
This time of year when I see flowers poking up through the still-brown leaves and other debris from winter they look especially beautiful to me…almost illuminated against their drab backdrop. I snapped a few closeups today of flowers growing in my neighbor’s front yard. The two below I find particularly interesting…I didn’t realize it when I was taking the photos–just concentrating on holding the camera steady–but if you look close you can see a little bug staring back at me (click any for a larger view).

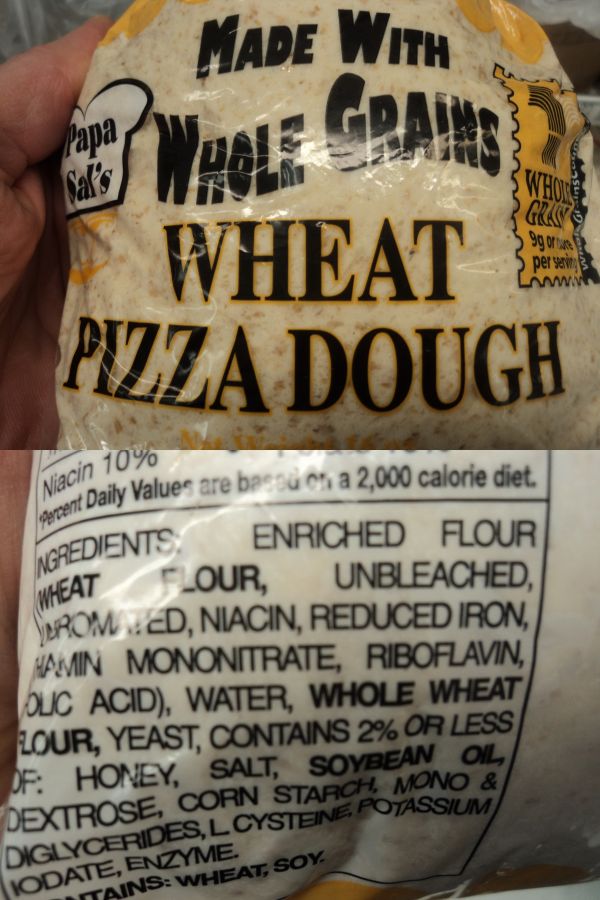
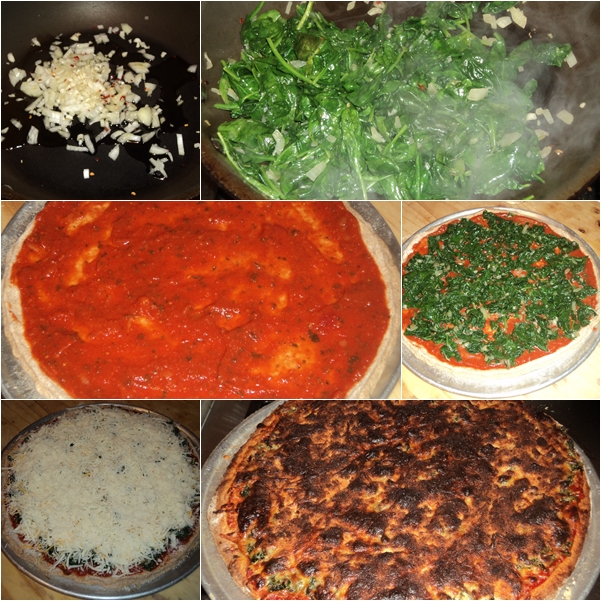
I just finished eating half of the above pizza (I’ll save the other half for tomorrow…gotta love leftover pizza). But before I talk about the pizza I have to mention a few things about the dough (no surprise, right?). If you know me or if you are a a regular reader of this blog then you know that I love to make bread (and I encourage everyone to include it into their daily routine…it is not as difficult as you may think), and I also do not believe carbohydrates make a person fat. I eat some sort of carb–pasta, rice, bread–at virtually every meal and I am well within my proper weight range. But as usual, I’m getting off topic. What I want to talk about is how easy it is to make pizza/bread dough (I made mine then put it in the fridge to ferment while I went to the health club and grocery shopping…when I came home it was ready) and also the few ingredients that go into it. A good dough needs nothing more than four ingredients (click here for a recipe), but I also included a bit of honey and olive oil (click here for a recipe)…and this brings me to the somewhat misleading advertising. As I passed the refrigerated section in the supermarket a pile of this (below) pizza dough caught my eye, mostly because of it’s title (and yes, I took pictures of it in the supermarket–I didn’t purchase it–and people were looking at me like I was a little crazy…who cares). First look at the title, then look at the ingredients. Whole wheat flour–the only “whole grain” listed–is more than halfway down the ingredient list.

Most of the ingredients listed in that dough are unnecessary…you only need four. The pizza I made tonight (pictured above and below) is not only delicious but also very easy to make…as easy as any other dinner you may make from scratch. And it’s super healthy, too…whole grains (for real), tomatoes, spinach, and some cheese. What’s not to like? For more explanation on making pizza–with pictures and recipes–click here.

>
I just finished eating half of the above pizza (I’ll save the other half for tomorrow…gotta love leftover pizza). But before I talk about the pizza I have to mention a few things about the dough (no surprise, right?). If you know me or if you are a a regular reader of this blog then you know that I love to make bread (and I encourage everyone to include it into their daily routine…it is not as difficult as you may think), and I also do not believe carbohydrates make a person fat. I eat some sort of carb–pasta, rice, bread–at virtually every meal and I am well within my proper weight range. But as usual, I’m getting off topic. What I want to talk about is how easy it is to make pizza/bread dough (I made mine then put it in the fridge to ferment while I went to the health club and grocery shopping…when I came home it was ready) and also the few ingredients that go into it. A good dough needs nothing more than four ingredients (click here for a recipe), but I also included a bit of honey and olive oil (click here for a recipe)…and this brings me to the somewhat misleading advertising. As I passed the refrigerated section in the supermarket a pile of this (below) pizza dough caught my eye, mostly because of it’s title (and yes, I took pictures of it in the supermarket–I didn’t purchase it–and people were looking at me like I was a little crazy…who cares). First look at the title, then look at the ingredients. Whole wheat flour–the only “whole grain” listed–is more than halfway down the ingredient list.
Most of the ingredients listed in that dough are unnecessary…you only need four. The pizza I made tonight (pictured above and below) is not only delicious but also very easy to make…as easy as any other dinner you may make from scratch. And it’s super healthy, too…whole grains (for real), tomatoes, spinach, and some cheese. What’s not to like? For more explanation on making pizza–with pictures and recipes–click here.


>
As I’ve mentioned many many times before on this blog I am not entirely car-free, but mostly. I feel I sometimes have to restate this in the event their are any new readers that happened to stumble upon this blog and are of the militant bicycle set, which I do not consider myself. Everyone has their own freewill to make their own choices, and I do not wish to push my lifestyle on theirs. But, on the other hand–and I’ve mentioned this many times before as well–I can’t help but wonder if the vast majority of adults who don’t use bikes as transportation (especially for simple little jaunts) wouldn’t truly enjoy themselves if they did. And this is exactly what I was pondering as I pedaled past the petrol station this morning on my way to work.
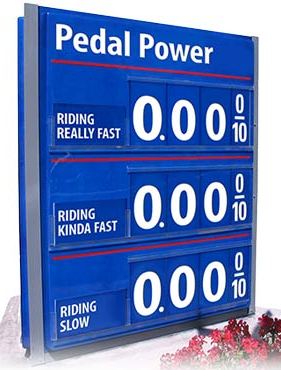
I was thinking this because the price of gas locally has finally surpassed that magical number…$4.00 per gallon. Just yesterday it was $3.93 (at this particular station); this morning it was $4.09. Now I know for those in the EU and many other areas of the world this is still cheap, but to us gas-guzzling Americans this is over the top. In 2008 when prices reached this high people actually started making changes in their driving habits. The prices, if I recall correctly, peaked out locally at about $4.25 before starting to descend. There’s talk of them going higher this year.
Now this next statement will probably make some people mad, infuriated even (but hopefully not on this blog)…I actually hope the prices do rise past $5.00/gl. I of course am not trying to send anyone to the poor house, nor do I want to cram my lifestyle down anyone’s throat. It’s just that I really believe if prices continue to rise people will have to make serious driving changes out of necessity. And this, I think (and nobody can disagree on this) will have a positive impact on the planet…and our society. And hopefully lessen some of the wars–current and future–which are all about oil no matter what name they put on them.
This evening I had a meeting to go to at church. It’s been raining on-and-off all day…a cold rain. And rain is the only element I don’t really care to ride in. I was not sure if I would drive or ride until the last minute; I also had to make a quick stop at my son’s mother’s house. Just before I left I walked outside and felt just a drop or two; the clouds were overcast and grey; a brisk spring wind blew. I hopped on my bike and made it to both to my ex-wife’s house and church with just a slight dampness; I pedaled pretty quickly and the 2 mile (3.2K) one-way trip took maybe 10 minutes. On my way home there was a light drizzle (I don’t mind riding in the rain on the way home–sometimes I actually like it–because I can change into dry clothes). It was still windy and the rain that hit my face made me squint as I rode into it. I watched the rain in the beam of my headlamp as I pedaled. Again, I pedaled quickly. When I arrived home I was only mildly wet but I felt good…alive! As I walked my bike up the plank on my porch I panted; it took me a few minutes to catch my breath from pedaling hard into the headwind.
I could have driven tonight but I didn’t, though I will this Sunday when I travel to my sister’s house–about 25 miles (40.2K)–for Easter dinner. I find it easy for most things without my truck. My bike(s) get me most places within the city limits nearly (but not quite) as quickly as my truck, and I can carry everything I need. I get a bit of exercise while doing it, have a lower environmental footprint, and most importantly (from a selfish point of view) I save money.
$0.00 per gallon (or at least close to it) is possible, one just has to make the effort. I’ll get of my virtual soapbox now.

>
As I’ve mentioned many many times before on this blog I am not entirely car-free, but mostly. I feel I sometimes have to restate this in the event their are any new readers that happened to stumble upon this blog and are of the militant bicycle set, which I do not consider myself. Everyone has their own freewill to make their own choices, and I do not wish to push my lifestyle on theirs. But, on the other hand–and I’ve mentioned this many times before as well–I can’t help but wonder if the vast majority of adults who don’t use bikes as transportation (especially for simple little jaunts) wouldn’t truly enjoy themselves if they did. And this is exactly what I was pondering as I pedaled past the petrol station this morning on my way to work.
I was thinking this because the price of gas locally has finally surpassed that magical number…$4.00 per gallon. Just yesterday it was $3.93 (at this particular station); this morning it was $4.09. Now I know for those in the EU and many other areas of the world this is still cheap, but to us gas-guzzling Americans this is over the top. In 2008 when prices reached this high people actually started making changes in their driving habits. The prices, if I recall correctly, peaked out locally at about $4.25 before starting to descend. There’s talk of them going higher this year.
Now this next statement will probably make some people mad, infuriated even (but hopefully not on this blog)…I actually hope the prices do rise past $5.00/gl. I of course am not trying to send anyone to the poor house, nor do I want to cram my lifestyle down anyone’s throat. It’s just that I really believe if prices continue to rise people will have to make serious driving changes out of necessity. And this, I think (and nobody can disagree on this) will have a positive impact on the planet…and our society. And hopefully lessen some of the wars–current and future–which are all about oil no matter what name they put on them.
This evening I had a meeting to go to at church. It’s been raining on-and-off all day…a cold rain. And rain is the only element I don’t really care to ride in. I was not sure if I would drive or ride until the last minute; I also had to make a quick stop at my son’s mother’s house. Just before I left I walked outside and felt just a drop or two; the clouds were overcast and grey; a brisk spring wind blew. I hopped on my bike and made it to both to my ex-wife’s house and church with just a slight dampness; I pedaled pretty quickly and the 2 mile (3.2K) one-way trip took maybe 10 minutes. On my way home there was a light drizzle (I don’t mind riding in the rain on the way home–sometimes I actually like it–because I can change into dry clothes). It was still windy and the rain that hit my face made me squint as I rode into it. I watched the rain in the beam of my headlamp as I pedaled. Again, I pedaled quickly. When I arrived home I was only mildly wet but I felt good…alive! As I walked my bike up the plank on my porch I panted; it took me a few minutes to catch my breath from pedaling hard into the headwind.
I could have driven tonight but I didn’t, though I will this Sunday when I travel to my sister’s house–about 25 miles (40.2K)–for Easter dinner. I find it easy for most things without my truck. My bike(s) get me most places within the city limits nearly (but not quite) as quickly as my truck, and I can carry everything I need. I get a bit of exercise while doing it, have a lower environmental footprint, and most importantly (from a selfish point of view) I save money.
$0.00 per gallon (or at least close to it) is possible, one just has to make the effort. I’ll get of my virtual soapbox now.


Though this may vaguely resemble an impressionistic painting it’s not…just a blurry photo off my front porch earlier this evening. Yes, it may be closer to May than it is to March but we still had a heavy snow squall today. I know it is officially spring but it certainly doesn’t feel like it…as I type these words my little wood burning stove, which sits a few feet from my desk, is at full bore.
>
Though this may vaguely resemble an impressionistic painting it’s not…just a blurry photo off my front porch earlier this evening. Yes, it may be closer to May than it is to March but we still had a heavy snow squall today. I know it is officially spring but it certainly doesn’t feel like it…as I type these words my little wood burning stove, which sits a few feet from my desk, is at full bore.
I love this short film…incredibly inspiring! It shows that the average person can get around by bike and carry all the stuff they need…including their kids. And to quote one of the people in the film…you don’t have to be a nerd to do it!
>
I love this short film…incredibly inspiring! It shows that the average person can get around by bike and carry all the stuff they need…including their kids. And to quote one of the people in the film…you don’t have to be a nerd to do it!
I’ve posted recipes for this bread–or variations of it–in the past on numerous occasions, but the two most popular are here and here. Those two posts, in fact, draw the largest amount of visitors to this blog everyday (through search engines, I imagine). Yup, I can carry things on my bike until I’m blue in the face, and talk about quotes and all things spiritual…but the topic that gets the most hits are my recipes for Ezekiel Bread.
This post is a little different in that I made the bread at home (opposed to at work in a commercial kitchen), and I did not use any refined (white) flour; just whole wheat. And for that reason the recipe is slightly different than the others (a printable recipe follows the pictures). This one, I believe, is more true…refined flour was unknown in biblical times. But I’m getting ahead of myself. In this post I also wanted to offer some of my personal views on Ezekiel bread and its recipes in general (I know what you’re thinking…here he goes again, up on his little soapbox…but hey, isn’t that why people write blogs in the first place).
Many people know–but some may do not–that the original recipe, vague as it is, comes directly from the Bible, in the Book of Ezekiel.
“Take wheat and barley, beans and lentils, millet and spelt; put them in a storage jar and use them to make bread for yourself.” Ezekiel 4:9 (NIV)
That’s it; that’s all it says. But I’m getting ahead again.
A couple years ago I dropped off a loaf of this bread–still warm–to a store that bakes their own bread (a few friends work there). After I left I had heard how a couple of them said that while the bread was delicious it was not really Ezekiel bread because real Ezekiel bread is made from sprouted grains and contains no flour. This did not surprise me because I had heard comments like this before (read them, mostly, on the Internet). I have to wonder how someone would have such a definitive opinion on this recipe from just one sentence. Here it is again:
“Take wheat and barley, beans and lentils, millet and spelt; put them in a storage jar and use them to make bread for yourself.” Ezekiel 4:9 (NIV)
Before I offer further views I first have to say that I read this recipe the same way I read the Bible; I read the Bible with a metaphysical view and am intrigued by it’s mystery (and even sometimes overwhelmed), but view it mostly as metaphor. In short, I am not a literalist and truly believe that most if not all of the Bible is open to interpretation (and yes, I realize that some may say that I’m going to hell for this proclamation, so here’s another one…I don’t believe that hell exists). Now I’m really getting off point.
This said, I can see how someone could interpret the above sentence to say to sprout the grains before making bread with them…but then again, it doesn’t actually say that. There is no mention of adding water to the jar to sprout the grains or even how to make a sort of dough…but just to use them to make bread for yourself (and I have neither the time nor desire to expound on all the metaphors of bread in the Bible). But if a person were to add water the grain would eventually begin to ferment (and leaven) given the amount of time Ezekiel is told to lie on his side in the desert. And as far as using flour in this recipe…umm, I may be wrong but I’m pretty sure that flour is made from wheat, spelt, and barley; three of the main ingredients.
Nobody that I know of would want to take this recipe to the literal extent. After giving Ezekiel the recipe, instructing how much of it he should eat each day, and how long he is to lie on each side in the desert, God tells Ezekiel to cook the bread over human excrement, to which Ezekiel pleads that he be allowed to use animal dung instead of human waste. Thankfully God agrees. I’m still trying to figure out the metaphorical or mystical reason behind this; surely it is not literal. The Book of Ezekiel is, of course, a record of a series of visions recorded by the Prophet Ezekiel. Thus in my view there is no way to tell what the actual recipe was or is.
As aforementioned, like most (or all) of the Bible, I believe that this recipe (sentence) is open to interpretation. The recipe that follows is my personal interpretation.
What’s slightly different in this recipe (opposed to previous versions where I used some white flour) is that rather than using a loose pre-ferment (French poolish), I used a firmer one, more like an Italian biga. And I also incorporated the autolyse method with the remaining flour (meaning I soaked the whole wheat flour to soften it). Anyhow, here it is in words and pictures; a printable recipe follows. It’s a simple recipe…basically, put some beans and grains in a pot and make bread for yourself.
Start by boiling the grains in logical succession to insure that they are thoroughly cooked without completely dissolving. If too much water evaporates add more to the pot (you’ll need some of the cooking liquid for the bread recipe. by using the cooking liquid you are utilizing nutrients that may have been leached out of the grains during their cooking).

After all of the grains are soft, strain them–reserving the liquid–and allow them to cool off (refrigerate them if necessary). Beautiful, aren’t they?

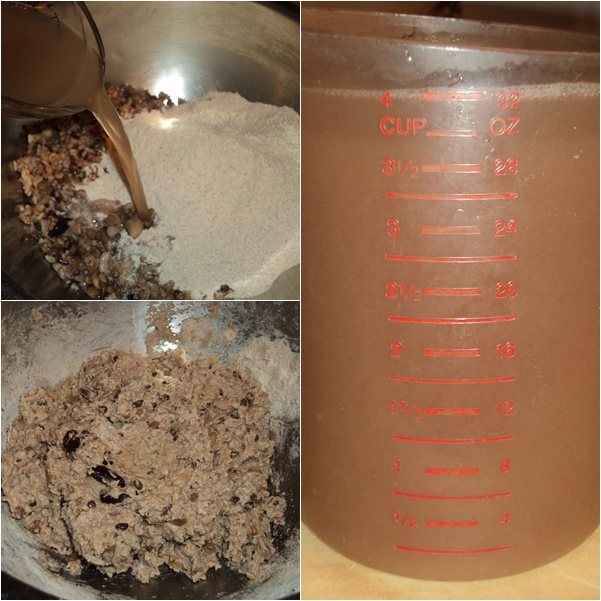
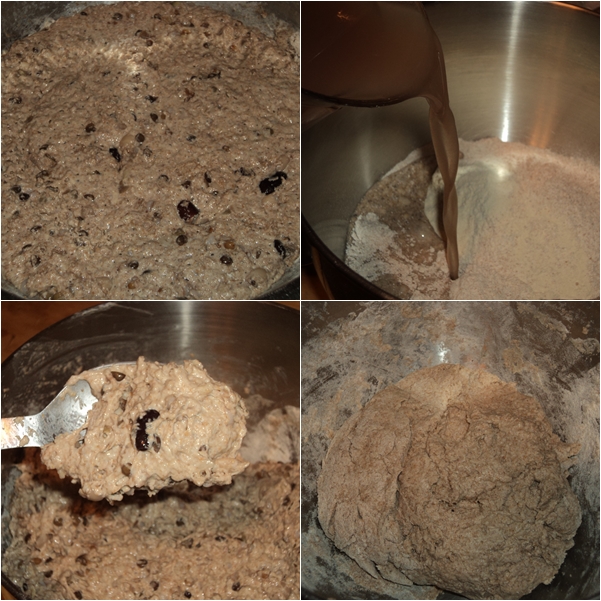
Make the pre-ferment with the cooked grains, whole wheat flour, and a portion of the cooking liquid.

Allow the pre-ferment to rest for at least an hour or two ( I let it ferment overnight). Then, in a second bowl, combine the whole wheat flour with some of the remaining cooking liquid (do not add yeast or anything else to this at this point…this is the autolyse method I referred to earlier). The flour-liquid mixture only needs to rest for an hour or so.

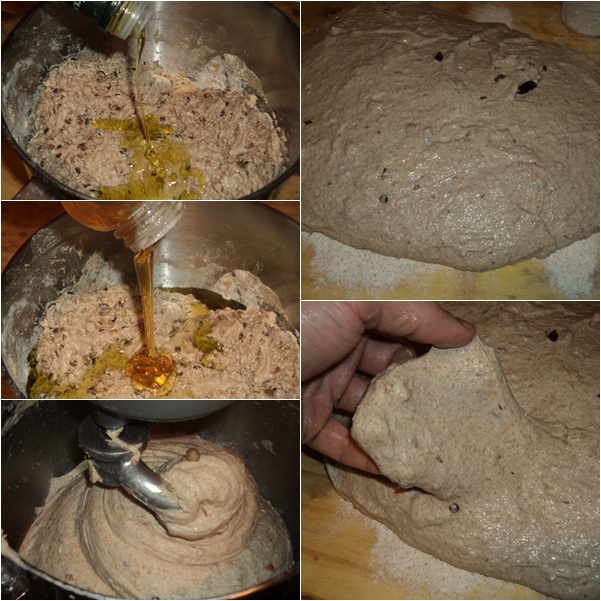
Next, combine the pre-ferment with the flour-liquid mixture, along with a bit of honey, olive oil, salt, and an additional pinch of yeast. Knead the dough until it passes the windowpane test.
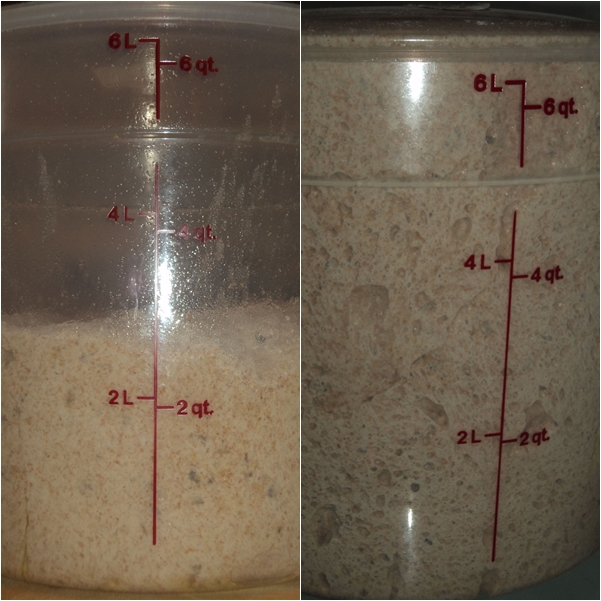
Place the dough in a bowl or rising bucket and allow it to rise once or twice. I slowed its fermentation by placing it in the refrigerator for six hours, but you can still see it’s rise…it almost popped the lid on the bucket.
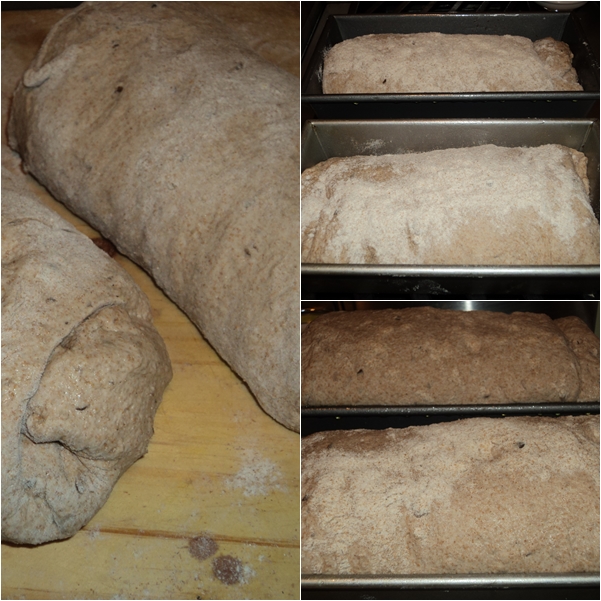
Portion and shape the dough. Place it into pans and allow it to rise.
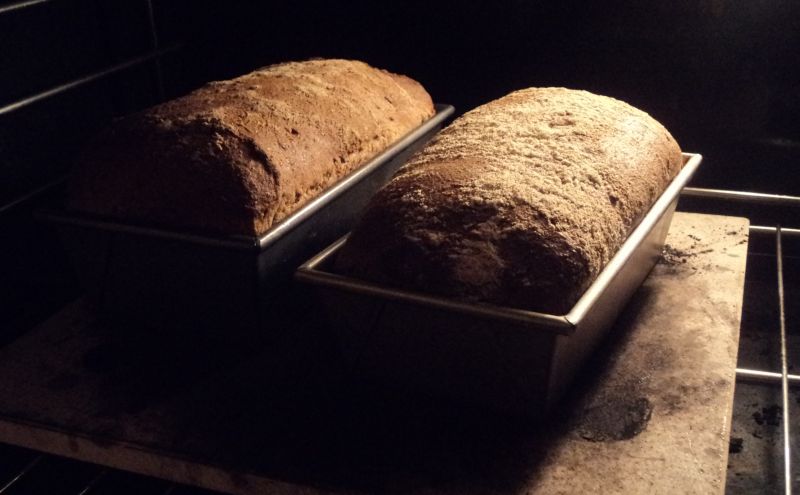
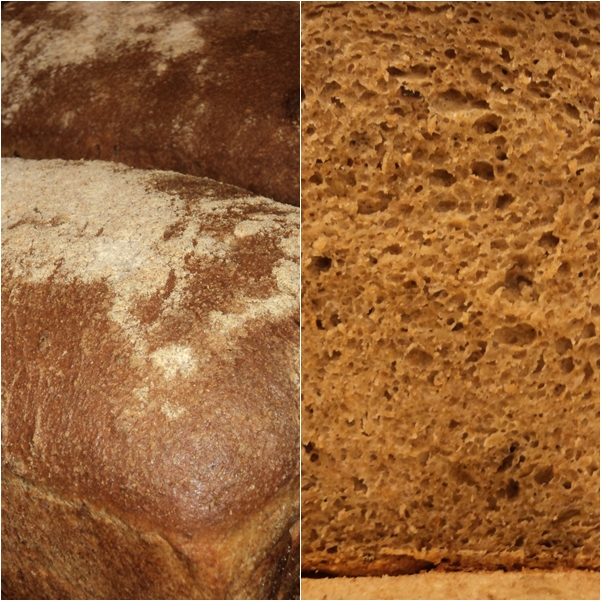
Bake the loaves for 30-40 minutes and then let them cool before slicing. You can see the nice open crumb and specks of grain. It is not necessary to grind the grain because most of it sort of mashes into the dough as it’s kneaded. It is as delicious as it looks. This bread makes excellent sandwiches and toast. Some say that it is nutritionally complete.
This post and the pictures may make it seem like this is a difficult or overly complicated bread to prepare…it’s not. It is as simple as any other bread with just a couple extra steps (mainly cooking the beans and grains). If you look at the recipe and break it down into steps or stages you will see that it is rather simple. I encourage you to try it…you will be glad that you did.
4 cups whole wheat flour
Boil the grains in the water in logical succession according to cooking times: first the white and red beans (about 60 minutes), when they are soft add the, spelt berries, lentils, and barley (about 30 minutes); lastly, add the millet and bulgar (about 10 minutes). The key is that after each addition the previous grain must be soft enough so that when all of the grains are in the pot they will all be equally soft; undercooked grains (especially the beans) can really ruin this bread. And as the grains cook add more water to the pot as necessary because the cooking liquid, which is full of nutrients, will become part of the recipe (keeping a lid on the pot will slow it’s evaporation). After the grains are cooked allow them to cool in the liquid to room temperature, refrigerating if necessary. After the grains are cooled drain them, squeezing them with your hands or the back of a spoon, reserving the cooking liquid.
Turn the dough out onto a floured work surface and cut it into 2 or 3 pieces. Shape into loaves and place into lightly oiled pans. Loosely cover the loaves with plastic wrap and allow to ferment for 30-60 minutes, or until double in size and when gently touched with a fingertip an indentation remains.
Bake the breads for about 30-40 minutes, adding steam to the oven a few times (either with ice cubes or a spray bottle) and rotating the breads every ten minutes. The breads are done when they are dark brown and sound hollow when tapped upon. Remove the breads from their pans and allow them to cook on a wire rack for at least 10 minutes before slicing.
>
I’ve posted recipes for this bread–or variations of it–in the past on numerous occasions, but the two most popular are here and here. Those two posts, in fact, draw the largest amount of visitors to this blog everyday (through search engines, I imagine). Yup, I can carry things on my bike until I’m blue in the face, and talk about quotes and all things spiritual…but the topic that gets the most hits are my recipes for Ezekiel Bread.
This post is a little different in that I made the bread at home (opposed to at work in a commercial kitchen), and I did not use any refined (white) flour; just whole wheat. And for that reason the recipe is slightly different than the others (a printable recipe follows the pictures). This one, I believe, is more true…refined flour was unknown in biblical times. But I’m getting ahead of myself. In this post I also wanted to offer some of my personal views on Ezekiel bread and its recipes in general (I know what you’re thinking…here he goes again, up on his little soapbox…but hey, isn’t that why people write blogs in the first place).
Many people know–but some may do not–that the original recipe, vague as it is, comes directly from the Bible, in the Book of Ezekiel.
“Take wheat and barley, beans and lentils, millet and spelt; put them in a storage jar and use them to make bread for yourself.” Ezekiel 4:9 (NIV)
That’s it; that’s all it says. But I’m getting ahead again.
A couple years ago I dropped off a loaf of this bread–still warm–to a store that bakes their own bread (a few friends work there). After I left I had heard how a couple of them said that while the bread was delicious it was not really Ezekiel bread because real Ezekiel bread is made from sprouted grains and contains no flour. This did not surprise me because I had heard comments like this before (read them, mostly, on the Internet). I have to wonder how someone would have such a definitive opinion on this recipe from just one sentence. Here it is again:
“Take wheat and barley, beans and lentils, millet and spelt; put them in a storage jar and use them to make bread for yourself.” Ezekiel 4:9 (NIV)
Before I offer further views I first have to say that I read this recipe the same way I read the Bible; I read the Bible with a metaphysical view and am intrigued by it’s mystery (and even sometimes overwhelmed), but view it mostly as metaphor. In short, I am not a literalist and truly believe that most if not all of the Bible is open to interpretation (and yes, I realize that some may say that I’m going to hell for this proclamation, so here’s another one…I don’t believe that hell exists). Now I’m really getting off point.
This said, I can see how someone could interpret the above sentence to say to sprout the grains before making bread with them…but then again, it doesn’t actually say that. There is no mention of adding water to the jar to sprout the grains or even how to make a sort of dough…but just to use them to make bread for yourself (and I have neither the time nor desire to expound on all the metaphors of bread in the Bible). But if a person were to add water the grain would eventually begin to ferment (and leaven) given the amount of time Ezekiel is told to lie on his side in the desert. And as far as using flour in this recipe…umm, I may be wrong but I’m pretty sure that flour is made from wheat, spelt, and barley; three of the main ingredients.
Nobody that I know of would want to take this recipe to the literal extent. After giving Ezekiel the recipe, instructing how much of it he should eat each day, and how long he is to lie on each side in the desert, God tells Ezekiel to cook the bread over human excrement, to which Ezekiel pleads that he be allowed to use animal dung instead of human waste. Thankfully God agrees. I’m still trying to figure out the metaphorical or mystical reason behind this; surely it is not literal. The Book of Ezekiel is, of course, a record of a series of visions recorded by the Prophet Ezekiel. Thus in my view there is no way to tell what the actual recipe was or is.
As aforementioned, like most (or all) of the Bible, I believe that this recipe (sentence) is open to interpretation. The recipe that follows is my personal interpretation.
What’s slightly different in this recipe (opposed to previous versions where I used some white flour) is that rather than using a loose pre-ferment (French poolish), I used a firmer one, more like an Italian biga. And I also incorporated the autolyse method with the remaining flour (meaning I soaked the whole wheat flour to soften it). Anyhow, here it is in words and pictures; a printable recipe follows. It’s a simple recipe…basically, put some beans and grains in a pot and make bread for yourself.
Start by boiling the grains in logical succession to insure that they are thoroughly cooked without completely dissolving. If too much water evaporates add more to the pot (you’ll need some of the cooking liquid for the bread recipe. by using the cooking liquid you are utilizing nutrients that may have been leached out of the grains during their cooking).

After all of the grains are soft, strain them–reserving the liquid–and allow them to cool off (refrigerate them if necessary). Beautiful, aren’t they?
Make the pre-ferment with the cooked grains, whole wheat flour, and a portion of the cooking liquid.
Allow the pre-ferment to rest for at least an hour or two ( I let it ferment overnight). Then, in a second bowl, combine the whole wheat flour with some of the remaining cooking liquid (do not add yeast or anything else to this at this point…this is the autolyse method I referred to earlier). The flour-liquid mixture only needs to rest for an hour or so.
Next, combine the pre-ferment with the flour-liquid mixture, along with a bit of honey, olive oil, salt, and an additional pinch of yeast. Knead the dough until it passes the windowpane test.

Place the dough in a bowl or rising bucket and allow it to rise once or twice. I slowed its fermentation by placing it in the refrigerator for six hours, but you can still see it’s rise…it almost popped the lid on the bucket.
Portion and shape the dough. Place it into pans and allow it to rise.
Bake the loaves for 30-40 minutes and then let them cool before slicing. You can see the nice open crumb and specks of grain. It is not necessary to grind the grain because most of it sort of mashes into the dough as it’s kneaded. It is as delicious as it looks. This bread makes excellent sandwiches and toast. Some say that it is nutritionally complete.
This post and the pictures may make it seem like this is a difficult or overly complicated bread to prepare…it’s not. It is as simple as any other bread with just a couple extra steps (mainly cooking the beans and grains). If you look at the recipe and break it down into steps or stages you will see that it is rather simple. I encourage you to try it…you will be glad that you did.
4 cups whole wheat flour
Boil the grains in the water in logical succession according to cooking times: first the white and red beans (about 60 minutes), when they are soft add the, spelt berries, lentils, and barley (about 30 minutes); lastly, add the millet and bulgar (about 10 minutes). The key is that after each addition the previous grain must be soft enough so that when all of the grains are in the pot they will all be equally soft; undercooked grains (especially the beans) can really ruin this bread. And as the grains cook add more water to the pot as necessary because the cooking liquid, which is full of nutrients, will become part of the recipe (keeping a lid on the pot will slow it’s evaporation). After the grains are cooked allow them to cool in the liquid to room temperature, refrigerating if necessary. After the grains are cooled drain them, squeezing them with your hands or the back of a spoon, reserving the cooking liquid.
Turn the dough out onto a floured work surface and cut it into 2 or 3 pieces. Shape into loaves and place into lightly oiled pans. Loosely cover the loaves with plastic wrap and allow to ferment for 30-60 minutes, or until double in size and when gently touched with a fingertip an indentation remains.
Bake the breads for about 30-40 minutes, adding steam to the oven a few times (either with ice cubes or a spray bottle) and rotating the breads every ten minutes. The breads are done when they are dark brown and sound hollow when tapped upon. Remove the breads from their pans and allow them to cook on a wire rack for at least 10 minutes before slicing.

OK, firstly…there’s nothing really urban simple about this post other than it falls under the category of cooking, and that it is part of my work so I suppose it is also part of the sacred journey of my everyday life (though it doesn’t always seem that way when I’m stressing out at work). Anyhow, as I’ve mentioned before I work in a private city club, and in envioromets like this a cook is able to make things–classical things–that he/she may not otherwise have the opportumity to (in a public restaurant)…this is one such dish. It is a variation on the classic French dish chaud froid, or hot-cold, making reference to the fact that it was prepared hot and then served cold (to read more about chaud froid, click here). It can be done with most meats, fish or poultry; in this case I used salmon. Whichever protein you use it is usually coated in an aspic, or a sauce that has had gelatin added to it. In the instance of this recipe–after poaching the fish whole, chilling them, and removing their skin and fins–I also dipped thinly sliced cucumbers in aspic and applied them to the fish to make them a sort of pseudo edible scale. It’s also garnished with minced vegetables and whipped seasoned cream cheese. Sounds odd…maybe, but if you enjoy fish this is surely delicious. Anyhow, here’s how I made it. (The bottom photo is Steve–one of our cooks–holding a fish so you can get a perspective of how big the fish are)