


Random Thoughts On Cooking, Bike Riding, and The Sacred Journey of Everyday Life

This recipe is classic Middle Eastern Food. It is also easy to make and so delicious that you won’t be able to stop eating it. The recipe I’ve included here, of course, is a variation on the traditional. This is a dish that is often eaten during Lent and for that reason usually remains vegetarian, but in this recipe I’ve included chicken broth. I also used long grain rice (basmati, actually) but you can use brown rice if you want to make it healthier (but you’ll have to increase the liquid and cooking time). And while much of the flavor comes from the caramelized onion, I also added broken pieces of vermicelli which were browned with the pasta. While I kept the seasonings simple, you can add a pinch of cumin, cinnamon, allspice, or hot pepper. I did add a pinch of turmeric for color (though it is not included in the recipe); hence it’s yellow hue. I made this for staff lunch today while at work, and my only problem with it is that I packaged up a container of leftovers for dinner and forgot it in the fridge at work…
Anyhow, this is really easy to make and super delicious. It can be used as a side dish or eaten as a main course. It can also be serve hot, at room temp, or even chilled. Here’s the recipe and a few pictures of it being prepared.
(For additional Lebanese/Middle Easter inspired recipes, click here.)

In order to explain the title of this post I have to tell a brief story. And the reason I tell this story is that I am a firm believer that good food can come out of mishap, or at least a near mishap. But I’m getting ahead of myself.
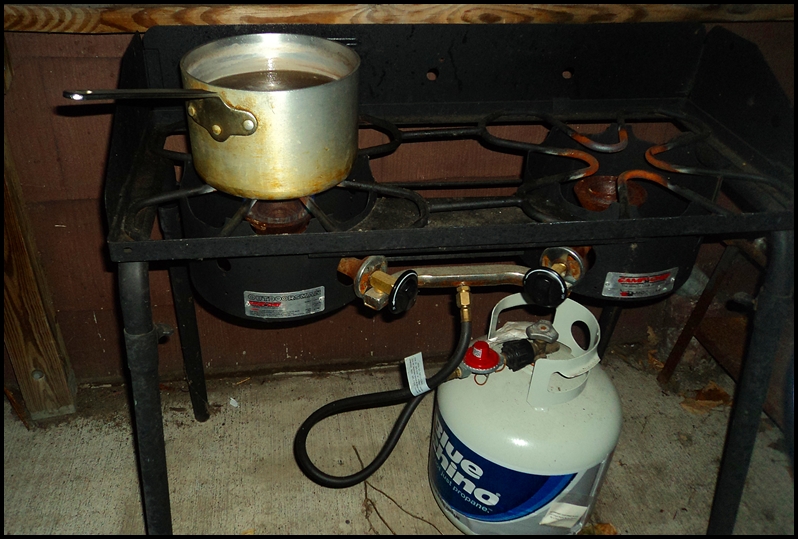
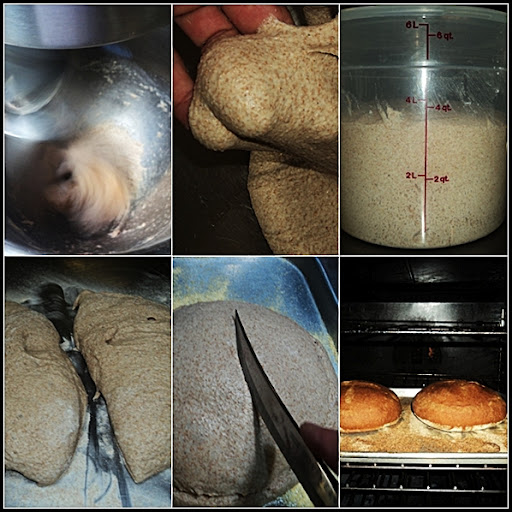
The above picture is that of my makeshift outdoor kitchen I often use in the summertime, lest I heat up my teeny indoor kitchen. Two days ago–in the evening–I decided to start a batch of Ezekiel Bread. I hadn’t made it in a while and thought I’d boil the beans and grains outside, then let the dough rise and ferment overnight in the fridge. I had the pot at a low simmer while doing yard work and went to the front yard and talked with a neighbor for a while. To cut to the chase…I forgot I had the beans simmering (at this point I had just red, white, and garbanzo beans in the pot; no grains).
More than an our later I sat down at my computer with a glass of wine to check my blog stats and email, and I noticed that I had another comment on the Ezekiel bread recipe. And as I’m sitting there thinking about how of all the posts that I make on this blog, nearly 80% of new visitors still find their way here through that recipe. I’ve mentioned this before, and am grateful for it, but I do hope people stick around and find something else they like as well. And this is what I was thinking about when I remembered the beans cooking on the stove in the back yard.
Shiiitt!!! I yell, startling my two pugs as I start running for the back door. My computer, where I was sitting is in the very front of the house and the outside stove is in the very rear. And as I sprinted towards the back door I could smell the faint aroma of caramelized beans (burnt, I thought). By now it was night and I had to take a flashlight with me. When I got back there I could hear the pot sizzling (not a good sign), but to my surprise I caught the beans at the precise moment before they went from caramelizing to burning. I quickly carried the post in the house and added more water to it, sending a plume of bean-infused steam into the air. I had to scrape stuck beans from the bottom of the pot, then added the remaining ingredients to finish cooking (and for these I set a timer).
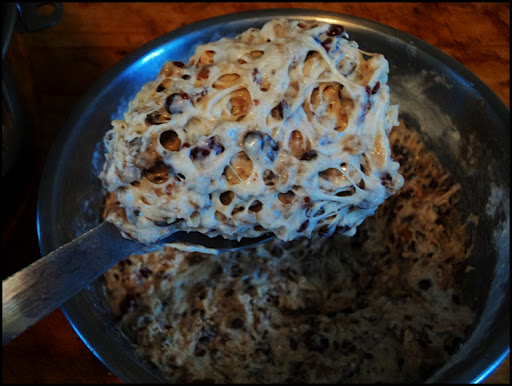
After the beans and grains were cooked I cooled the liquid quickly by adding some ice cubes to it so I could make the starter and autolyse to work over night. After mixing whole-wheat flour for the autolyse, I realized that I didn’t have enough whole-wheat flour to make the pre-ferment with the beans and grains (egad!). So I made it with unbleached bread flour (that’s it pictured above, fully active the next morning).
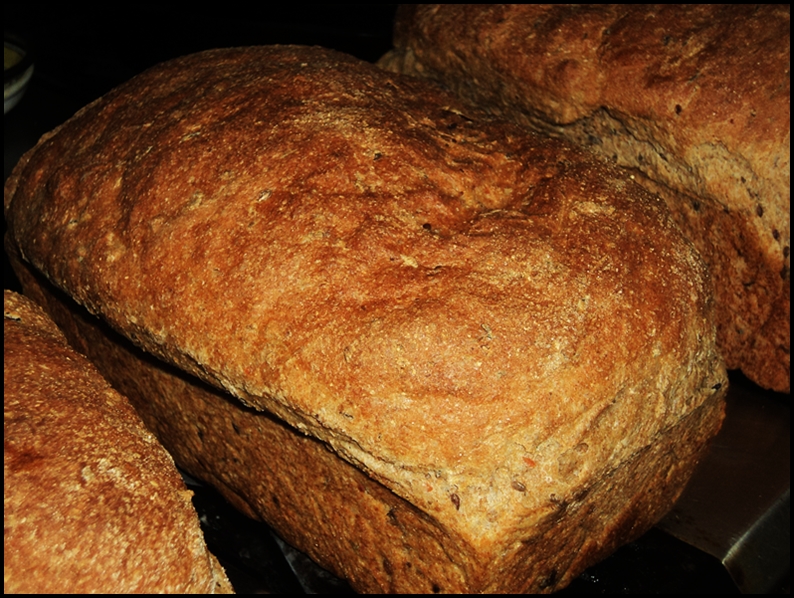
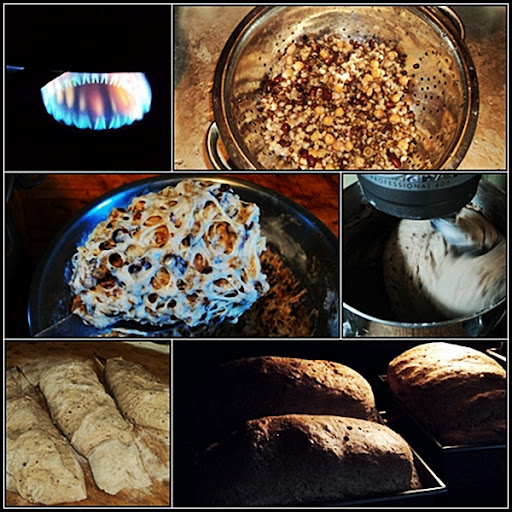
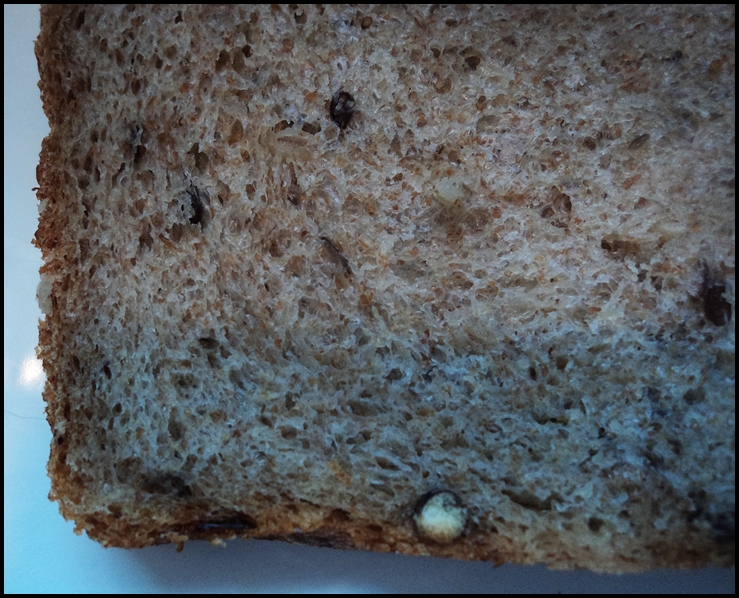
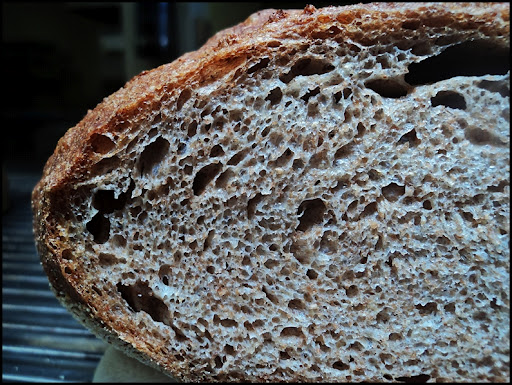
Anyhow, what I’m trying to say–I suppose–is that most the time things aren’t perfect but they usually work out. Often people tell me this recipe looks complicated or laborious when it’s really not. If you read it and break it into steps you’ll see that it is not difficult or complicated at all. I do hope you try it. The slice pictured at the bottom of the page is the one I ate for breakfast this morning…and yes it was delicious. And I’m not sure if it is because of the series of mishaps with this particular batch, but it seemed to taste especially delicious.
4 cups whole wheat flour
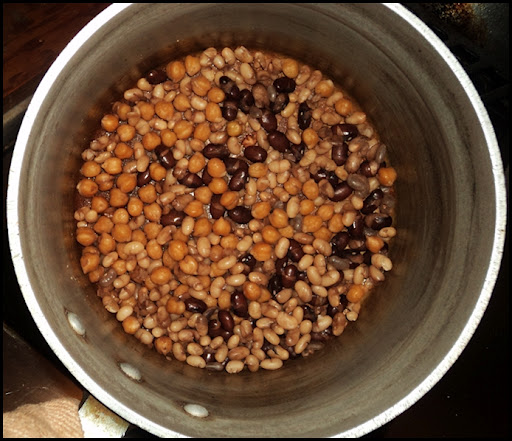
Boil the grains in the water in logical succession according to cooking times: first the white and red beans (about 60 minutes), when they are soft add the, spelt berries, lentils, and barley (about 30 minutes); lastly, add the millet and bulgar (about 10 minutes). The key is that after each addition the previous grain must be soft enough so that when all of the grains are in the pot they will all be equally soft; undercooked grains (especially the beans) can really ruin this bread. And as the grains cook add more water to the pot as necessary because the cooking liquid, which is full of nutrients, will become part of the recipe (keeping a lid on the pot will slow it’s evaporation). After the grains are cooked allow them to cool in the liquid to room temperature, refrigerating if necessary. After the grains are cooled drain them, squeezing them with your hands or the back of a spoon, reserving the cooking liquid.
Turn the dough out onto a floured work surface and cut it into 2 or 3 pieces. Shape into loaves and place into lightly oiled pans. Loosely cover the loaves with plastic wrap and allow to ferment for 30-60 minutes, or until double in size and when gently touched with a fingertip an indentation remains.
Bake the breads for about 30-40 minutes, adding steam to the oven a few times (either with ice cubes or a spray bottle) and rotating the breads every ten minutes. The breads are done when they are dark brown and sound hollow when tapped upon. Remove the breads from their pans and allow them to cook on a wire rack for at least 10 minutes before slicing.
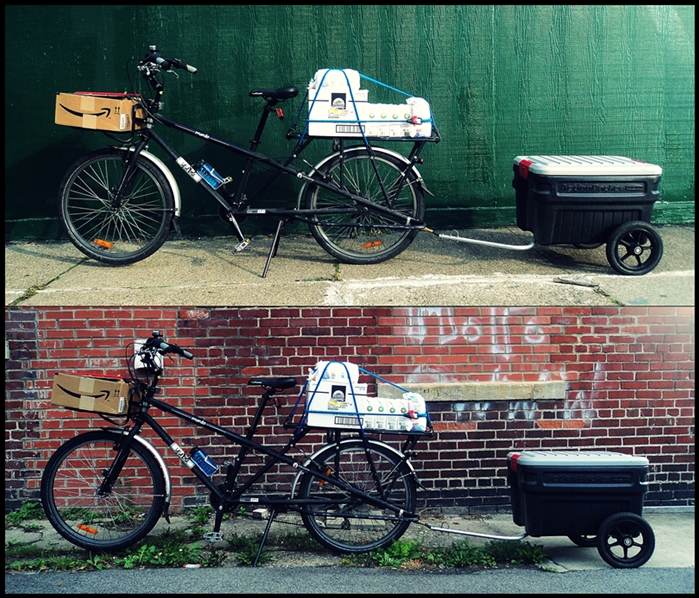
On the bike…A double portion of Chinese take-out, two bottles of red wine, and more than $200 worth of groceries in two cardboard boxes and a BikeRev trailer from three separate stores.
A couple quick comments…the first thing is that tomorrow is the first time in about three months I’ll be using a car (via Buffalo Car Share), and that it is possible–even for a middle aged guy–to go car free. Another thing–and this is really more of an observation–is that unless you are on a bike really loaded down with stuff you most likely don’t notice slight inclines. This evening, for example, after going to a grocery store that is slightly farther than my usual, I noticed that it was basically uphill the entire way home (I didn’t go for a swim today but still got my workout). And lastly, this is a comment from someone else. As I was huffing and puffing uphill with the bike fully loaded and pedaling slowly in 2nd or 3rd gear, I pass a group of kids on the street. They all just watch as I pedal slowly past them. And as I pass, one of them–a young girl of maybe 12 or 13–yells out, “Hey Mister…THAT is a really awesome bike!” That made it all worth it 🙂


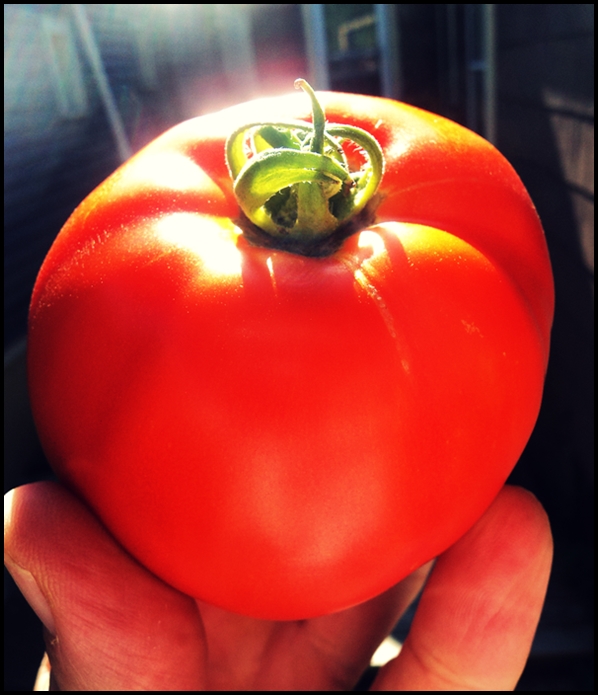
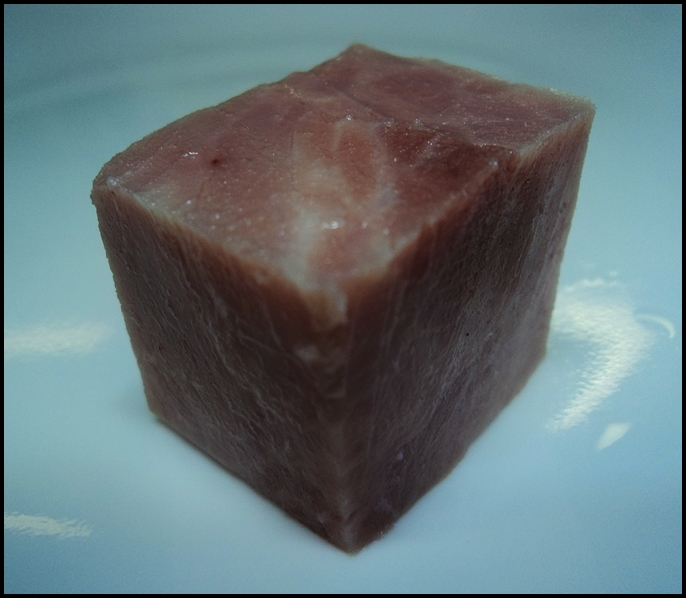
Beautiful isn’t it. It is–or at least was–as big as my fist. I ate most of it for dinner as an tomato and raw onion sandwich on whole wheat bread slathered with mayonnaise and doused with a liberal amount of cracked black pepper. It was, as I ate it, still warm from the sun. Delicious. I’ve always enjoyed growing my own tomatoes, but this one in particular seems especially special to me because, as I’ve stated in an earlier post, I’ve had a difficult time with “blossom end rot” this year. But this is a sign, I think, that the plants are overcoming it (with a little help from me). I’m keeping my fingers crossed. Anyhow, if you want to learn a bit of history, lore, and a few recipes involving tomatoes, here’s a link to an article I wrote for Artvoice a couple years ago.

#464 (top)…three loaves of whole wheat bread, a two-foot wooden dowel, two slices of savory vegetable Tart Tatin, four picture frame mats, a small portfolio, and a dough rising bucket.
#465 (middle)…six peaches, six nectarines, a dozen apples, a half-gallon of milk, a jar of peanut butter, a jar of jelly, 5 pounds of dog food, 18 newly developed photos, two bottles of red wine, and a gym bag full of wet clothes.
#466 (bottom)…a collapsible wire rack with wooden shelves (which I found at the curb and will be a great gardening accessory next year…and yes, I looked through the shelf as I rode; didn’t know how else to load it), and a canvas bag containing–among other things–an extra camera, a cell phone, a Bible, a book, a magazine, a journal, and a 3-ring binder.

On the bike…four heavy stackable steel CD racks.
A quick comment…I was on my way home from church this morning when I spotted these four racks at the curb as trash. My son, who has an ever-expanding CD collection, is in need of a few new shelves for them. Perfect. They are a simple design and made of heavy steel construction. If I were to purchase them they would likely have been expensive. My point is, I suppose, it is really handy riding a bike as an “everyday bike” that also has the capability to haul stuff…you never know what you’ll find along the road.
Urban Simplicity.


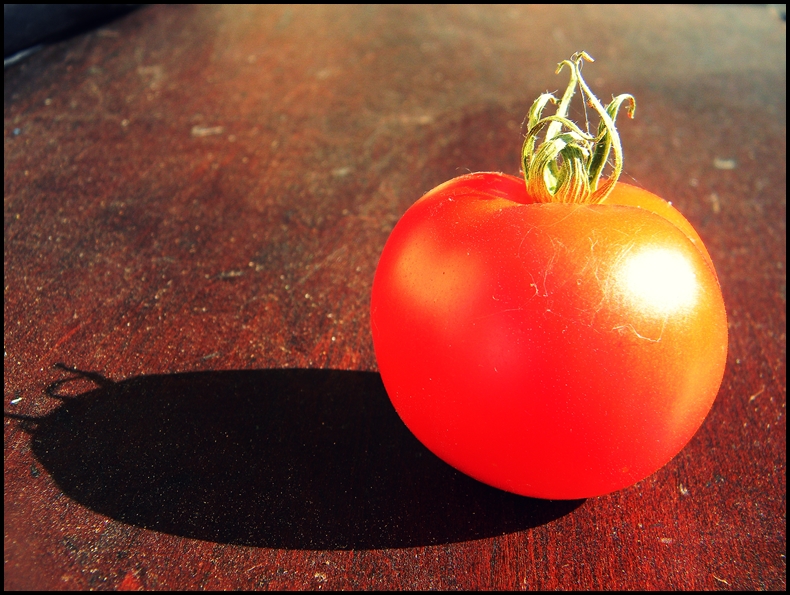
Every year it seems there is a new “issue” in the garden. Such is life, right? I can’t imaging how difficult it must be for farmers who rely on their crops for their livelihood, or those who rely on the food they grow to sustain them entirely. A few years ago I had an army of city rabbits who chose to inhabit my tiny gardens each night, then I had giant tomato-eating slugs wreak havoc, and last year there was a hungry city raccoon that all but wiped out my small patch of corn and ate it in a nearby tree (no kidding). Well, this year it is not an animal or insect that is causing trouble, but the plants themselves. The tomatoes in the front of my house, while they look incredibly healthy, are inflicted with–what I’ve finally been able to identify–the not so technical sounding blossom end rot…and it quite literally does as the name describes, the blossom end, or the end that is not connected to the plant, rots. I’m still getting a few healthy tomatoes from the front, and the rear garden does not seem affected, but it’s still early and most of them are still green (the rot begins while they are still green). The tomatoes pictured above and below obviously were not affected, but I’ve been pulling and discarding at least a half-dozen black rotted tomatoes a day in hopes of slowing and halting the problem. From what I’ve read this is not an easy problem to overcome, but I’ll try (and there are far worse problems to have in this world today). If any gardeners out there in the blogosphere have had this problem and overcame it I would love to here about it. Thanks. Anyhow, on to the recipe.

This recipe is about as simple as it gets but is still bursting with nutrients and flavor. It’s really just another aglio e olio type recipe, but in this case the ingredients are turned into a sauce. The easy steps are below.
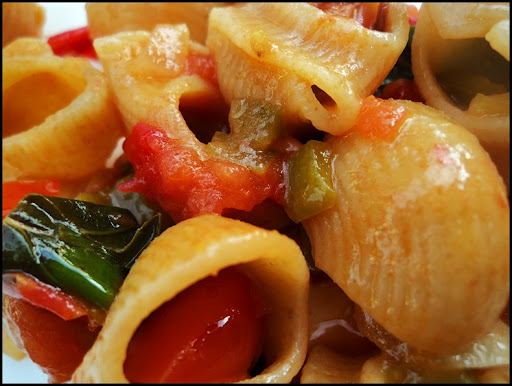
Heat olive oil in a heavy skillet and add onion, peppers, and garlic (I used sweet and hot peppers)…cook them slowly until they begin to brown, forming a sort of sofrito. Add diced tomato. Any type will do, I used two types of red tomatoes plus a couple yellow cherry tomatoes with seeds and skins intact. Cook the tomatoes for a couple minutes to release and evaporate some of their juices. Then add chicken broth (or vegetable broth if you want to keep it vegetarian) and a bit of seas salt. Bring the sauce to a boil then lower it to a simmer; cook the sauce for a few minutes until it reduces and thickens. Meanwhile boil whatever pasta you prefer. When the sauce is to your liking (in consistency and flavor) it can be pureed or left chunky, which is what I did. Add a few chopped basil leaves and then the cooked pasta. Toss or gently stir the pasta into the sauce allowing it to soak up flavors.

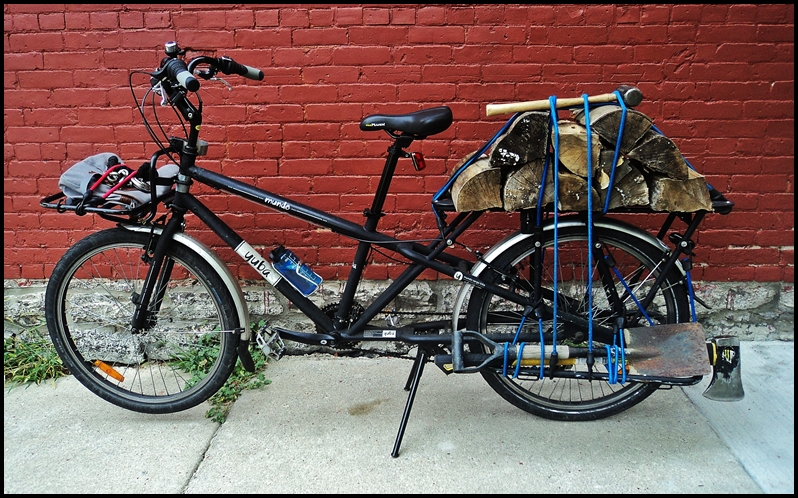
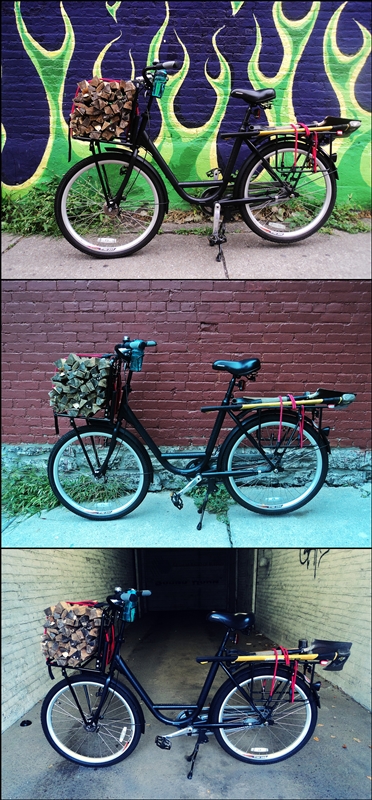
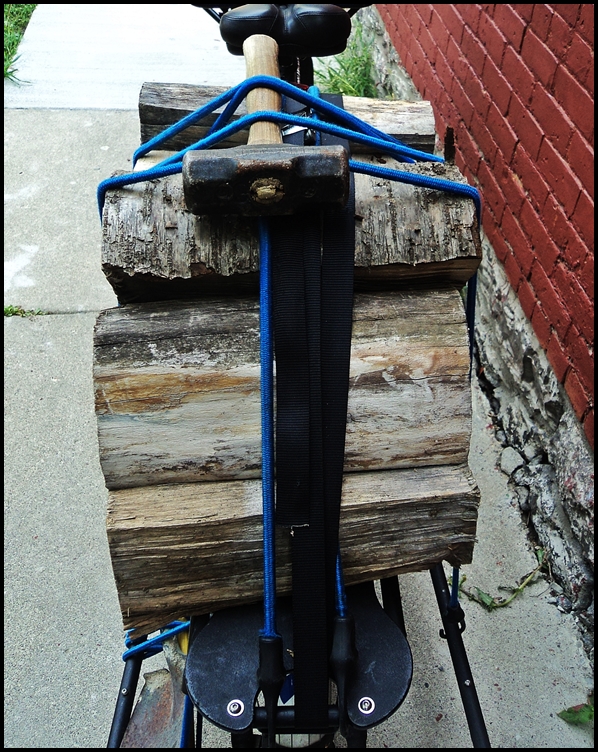
Ten split logs (firewood), an axe, a small shovel, a 3lb. mallet, and a canvas bag containing–among other things–a book, a magazine, a cell phone, and an extra camera.
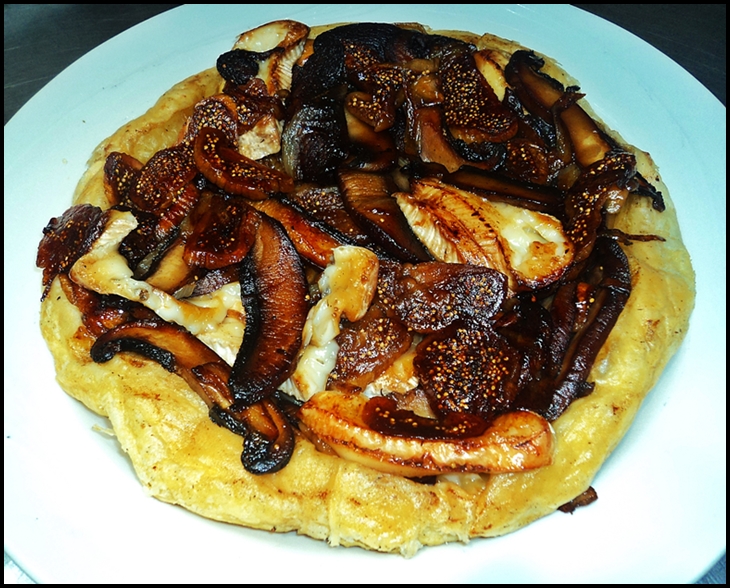
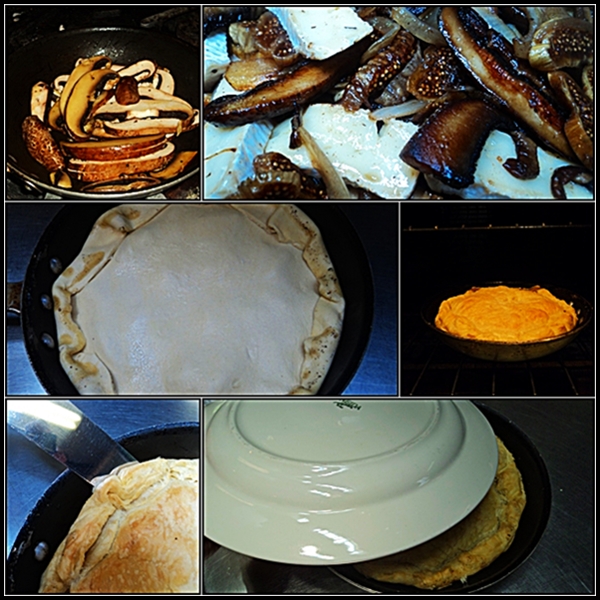
This recipe is a play on the classic Tarte Tatin, which of course is normally made with apples. I’m currently researching and testing recipes for an article I’m writing about Tarte Tatin for Buffalo Spree Magazine and thought I’d try a couple savory recipes (the poor Tatin sisters must be rolling in their graves); this one is made with portabello mushrooms, figs, and brie cheese. It’s sort of a savory rustic pie that is baked upside-down then turned right side-up to serve (and isn’t that what the original is only made with apples and caramel). Anyhow, it’s really delicious and easy to make…and you’ll likely impress your friends with it as well. When the article is published–with history, lore, and more recipes–I’ll post the link.


This is a third installment of photos from my somewhat recent trip to Paris (click here or here to see others). These photos were taken at Père Lachaise Cemetery. And while it may seem morbid to some to go on vacation across an ocean and on a different continent and visit a cemetery full of people you never met, it’s really not…it’s actually a beautiful place and a moving experience. This was my third time at this cemetery. Yes, of course Jim Morrison is buried here, but there are many other notable graves worth seeing; maps are sold at the gate and most tour books list them as well. One of the more moving tombs was that of Oscar Wilde. That’s the front of it pictured below. You can see the lipstick kiss someone left on his monument; the sides of it are virtually covered in lipstick kisses and notes scrawled in lipstick. You’ll see many tourists here, and it seems weird to me, in a way…that there are tourists for graves (and I was one of them). It’s a large cemetery and my son and I walked for an hour or two, sometimes in silence. And in those moments of silence, as I looked across the tombs and graves, the following Bible verse came to mind.
To take an online virtual tour of the cemetery, click here.


2 cups whole wheat flour
1 cup water
2 teaspoons instant yeast
————————
4 cups whole wheat flour
In one bowl make a preferment by combining 2 cups of whole wheat flour with 1 cup water and 2 teaspoons of instant yeast. Begin the autolyse in another bowl by combining 4 cups of whole wheat flour, the wheat gluten, and 2 cups water. Stir each bowl just enough to combine the ingredients, taking care not to get yeast into the bowl with the autolyse. Cover both bowls and allow to rest and ferment for 30-90 minutes, during which time the preferment will begin it’s job multiplying yeast and fermenting flour, and the autolyse will soak the grain, swelling the gluten.
After an hour or so, combine the ingredients from both bowls into the bowl of an upright mixer fitted with a dough hook. Add the salt and remaining 3 teaspoons of yeast (add the yeast and salt on opposite sides of the bowl). Knead the dough on medium speed for about 8 minutes. Place the dough in a lightly oiled container, cover it loosely, and allow to ferment for 1-2 hours, or until doubled in bulk. Deflate the dough and allow it to ferment an additional 30 minutes.
Turn the dough out onto a floured work surface and cut it into 2 or 3 pieces. Shape into loaves and place into lightly oiled pans (or shape them fre-form and place them on baking sheets). Loosely cover the loaves with plastic wrap and allow to ferment for 30-60 minutes, or until double in size and when gently touched with a fingertip an indentation remains.
Bake the breads for about 30-40 minutes, adding steam to the oven a few times (either with ice cubes or a spray bottle) and rotating the breads every ten minutes. The breads are done when they are dark brown and sound hollow when tapped upon. Remove the breads from their pans and allow them to cook on a wire rack for at least 10 minutes before slicing.

So there I was at the corner of Allen and Franklin Streets waiting for the light to change so I could make a left hand turn. It was already balmy. I had a bucket of just-mixed raw bread dough on my front rack (pictured above), which I bake at work during the hot weather so I don’t have to heat up my teeny home kitchen (the ovens are on all day at work anyhow). And as I stood straddling my bike I was enjoying the balmy weather but–I have to admit–dreading going to work in a hot kitchen. I was sort of daydreaming, I suppose, and glanced down at the bucket of dough thinking I’ll refrigerate it when I get to work (the heat and humidity would make it rise too quickly, resulting in a young dough). It was a little after 8am and not many cars on the narrow street. I heard a car approach behind me so I held out my left arm, indicating to the driver that I was turning left. And that’s when I heard it, first the horn then the yelling.
HOONNK…HONNNK! GET OUTTA THE ROAD!
Startled at first, then I turned in disbelief..maybe, I thought, this was not directed at me. But I was wrong. So I pointed towards the corner and yelled back “I’m turning left”…only to be met with:
HONNNNK…HOOONNNK! GET OUTTA THE MIDDLE OF THE ROAD!
The bumper to her car was just a few feet behind me, I have to say it made me a bit nervous. But here’s the best part:
The traffic light hadn’t even changed yet, if I was not in front of her she wouldn’t be going anywhere.
Now my blood pressure was beginning to rise, but I kept my composure. I calmly turned the bike around and went to her car window. The middle aged woman that was behind the wheel was like a caricature of a crazy-mad driver…there seemed to be spirals in her eyes and smoke coming from her nose and ears. I went directly to the window–didn’t raise my voice but I’m sure I had a “tone”–and told her that the bike that I was on was a street legal vehicle and had the same rights as her car, and that I was using hand signals, following the law, and had every right to be where I stood. For a second her eyes seemed to roll in back of her head, then she spat: “Get outta the road!” and then hit the gas (the light had changed). When she took off, making a left turn as well, her car nearly swiped me and if I didn’t remove my foot from her tire’s path it may have been ran over.
If I had a dollar for every time a person told me to get out of their way, get off the road, or on the sidewalk (pavements to my friends across the pond) I would be a “monetarily wealthy” person (and I purposely put quotes on monetarily wealthy because I believe there are many other ways to be wealthy than having buckets of cash).
Anyhow, and contrary to many motorists belief (and some bicyclists, I suppose), adults on bikes belong on the road and it is, in fact, illegal for an adult in New York State to ride a bicycle on the sidewalk. This got me thinking about other legalities and rights, and it didn’t take me long to find them. Here’s a couple snippets, to read the entire page on bicycle laws in New York State click here. And yes, I realize I’m likely preaching to the choir but I just had to vent. Thanks for listening. The italics and some of the bold lettering in the below quotes were placed by me.
§ 1231. Traffic laws apply to persons riding bicycles or skating or gliding on in-line skates.
Every person riding a bicycle or skating or gliding on in-line skates upon a roadway shall be granted all of the rights and shall be subject to all of the duties applicable to the driver of a vehicle by this title, except as to special regulations in this article and except as to those provisions of this title which by their nature can have no application.
§ 1234. Riding on roadways, shoulders, bicycle or in-line skates lanes and bicycle or in-line skates paths.
(a) Upon all roadways, any bicycle or in-line skates shall be driven either on a usable bicycle or in-line skates lane or, if a usable bicycle or in-line skates lane has not been provided, near the right-hand curb or edge of the roadway or upon a usable right-hand shoulder in such a manner as to prevent undue interference with the flow of traffic except when preparing for a left turn or when reasonably necessary to avoid conditions that would make it unsafe to continue along near the right-hand curb or edge. Conditions to be taken into consideration include, but are not limited to, fixed or moving objects, vehicles, bicycles, in-line skates, pedestrians, animals, surface hazards or traffic lanes too narrow for a bicycle or person on in-line skates and a vehicle to travel safely side-by-side within the lane.

Yes, I live a long way from Texas–where the above sign is designated–but I came across the sign recently (can’t remember where) and love it…and I wish there were some of these around NY State. It is, I think, good, really good to know your rights. But sometimes, such as when there is a lunatic in a large car directly behind you, it doesn’t make a difference. I’m sure if someone saw me immediately after my encounter I would have looked visibly shaken. I only had another city block to pedal before I arrived at work. As I pedaled a phrase from Mahatma Gandhi came to mind…
Be the change you want to see.
And this is what I thought about when I turned into my place of work and could see that just a few hundred feet down the road the woman who needed me “outta her way” so badly was stopped at the very next traffic signal.

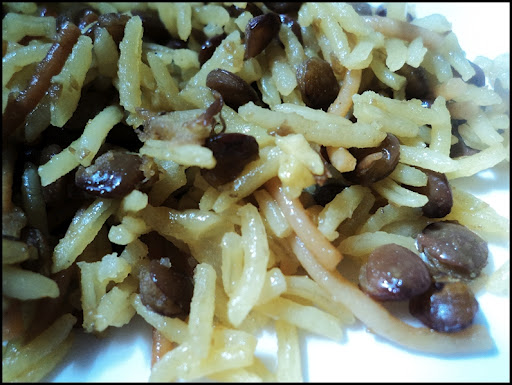
I made this salad for employee meal last night at work. Like much of the nation it has been hot in Western New York and the last thing I wanted to eat while working in a sweltering kitchen was something hot. This fit the bill; I had leftovers for lunch today. This is really just a variation of tabbouleh or fattoush…and when I say this I mean that while some of the salad ingredients are different (though some are also the same) the flavoring is the same; it’s made with a highly flavorful lemon-mint-olive oil dressing. The other key is to use lots of fresh parsley (too often American tabbouleh recipes lack a significant amount of parsley, making it a bulgar wheat salad garnished with parsley when in fact t is a parsley salad garnished with wheat). In addition to the vinaigrette and parsley in this recipe, I also used tomato, chick peas, cucumber, onion, and shredded carrots (I thought about adding cooked and cooled potatoes as well but didn’t have the time to cook and cool them)…basically you can add whatever ingredients you have…the fresh taste of the dressing and summer ingredients are foolproof.
For a traditional and also a barely tabbouleh recipe, click here.
For a fattoush recipe (with photos), click here.
For a really simple but very flavorful and versatile mint vinaigrette recipe, click here.
For additional Lebanese/Mediterranean inspired recipes (with plenty of photos), click here.
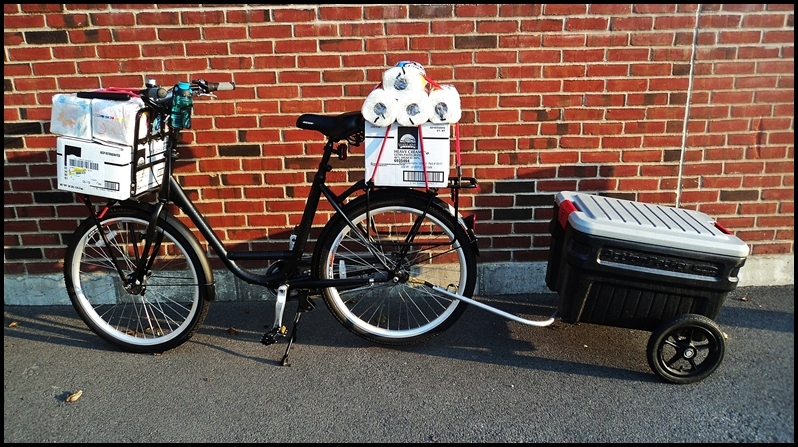
On the bike…Groceries, sundries, cleaning supplies, wine, dog food and dog care products in and on two cardboard boxes and in a trailer from three separate stores.
A brief comment…This is mostly but not entirely referring to a previous post where I carried home a log on a bike. Things that can be carried on a bike is my original and favorite series of this blog. And I’ll often (okay, maybe not often…but sometimes) tell people about it or or about some of the things that one is able to carry on a bike; that it is possible to carry things home and elsewhere without a car. Anyhow, last evening while at work I showed a co-worker the picture of the log on a bike on my work computer (we were on dinner break). Anyhow, he says to me, some may think that that photo is not real. What do you mean, I asked him, that its Photoshopped? All I’m saying is that some people with dubious minds may think the photo is not real. Umm…welll…I think you’re a bit dubious, I told him. With that, I assured him the photo was real (and that I’ve never used Photoshop)…but I’m still not sure he was convinced. I also mentioned to him that in the same way that the journey is not always about the destination but more so about the journey itself, I carry things on my bike(s) because…well…I can, but mostly because I think it’s fun. I can afford a car but choose not to. Going to a store for purchases and bringing them home in a car is just that, but doing it on a bike is an adventure…and that is the most important part of it, to me anyhow.